Pan-Seared Scallops in Lemon Garlic Butter
Pan-Seared Scallops in Lemon Garlic Butter
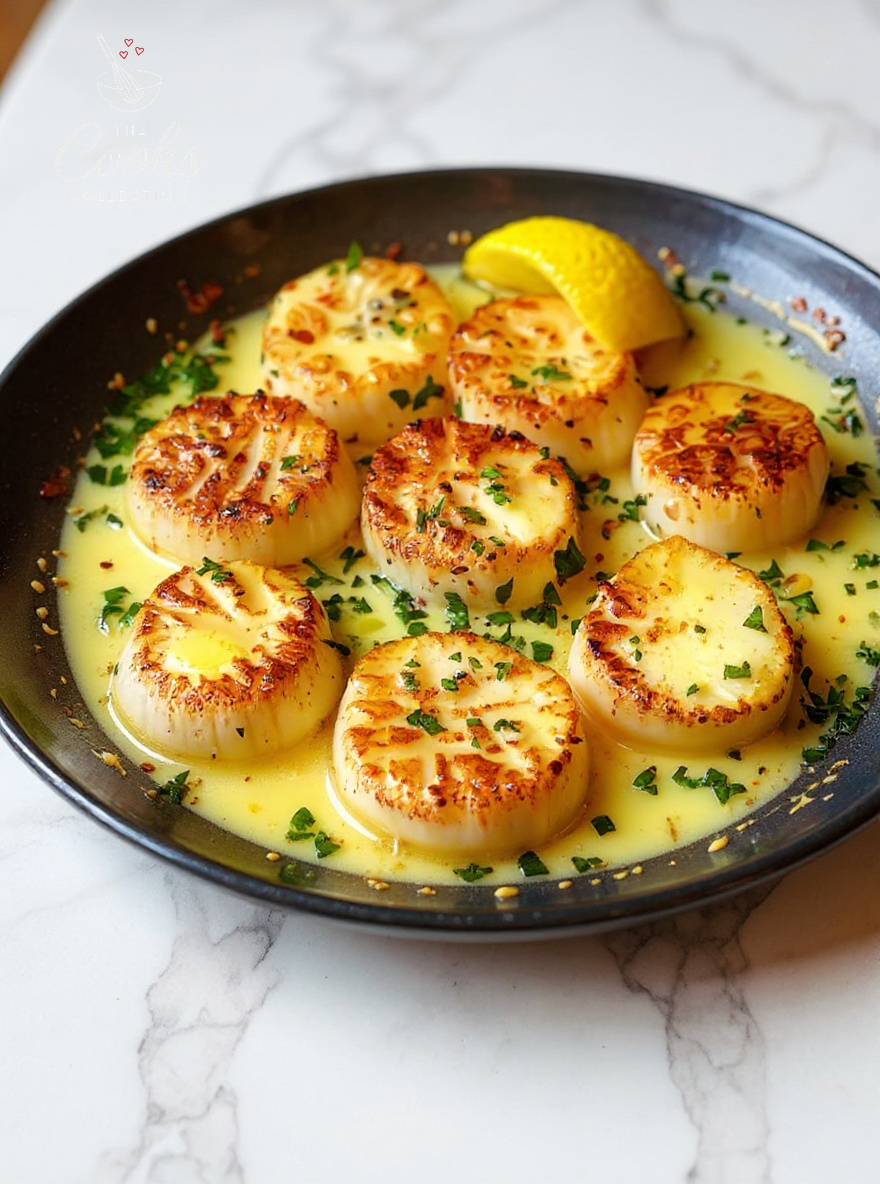
tall restaurant-level sear, a soft, custardy center, and a lemony garlic butter that pools around the scallops like liquid sunshine. If scallops have ever stuck, wept, or steamed on you, this page fixes it—no mystery chef tricks, just a repeatable skillet method that takes eight minutes once the pan is hot. You’ll also get the why behind every move: how dryness equals crust, why pan choice matters more than you think, and when to stop so you don’t cross the line from silky to bouncy. Hit Skip to Recipe if you’re mid-cook; the deep-dive below walks through temperature, smoke point, browning chemistry, and clean upgrades that won’t dull that ocean-sweet flavor.
Why this recipe works
Scallops are simple proteins with almost no connective tissue. They cook fast, and that speed is both the advantage and the trap. The goal is two textures in one bite: a brittle golden exterior and a center that’s barely opaque—think crème anglaise in seafood form. You get there by controlling three things: dryness, surface contact, and time.
Dryness: Water is the enemy of browning. Any surface moisture converts to steam and cools the pan, which makes scallops leak more water, and suddenly you’re simmering, not searing. Patting dry isn’t optional; it’s the difference between deep color in two minutes or pale, squeaky coins that never set. We also specify dry-pack sea scallops—never the “wet” ones treated with STP (sodium tripolyphosphate), which makes them hold water and resist browning.
Surface contact: A 12-inch pan gives you the runway you need. Crowding creates steam, and steam means no crust. Use stainless or cast-iron because they store heat and stay hot when cold scallops hit. Nonstick can work in a pinch, but it runs cooler and the crust won’t hit the same color or flavor.
Time & temperature: The sweet spot is usually 2–3 minutes first side, 1–2 minutes second side. Pull earlier than your instinct; carryover heat finishes the center. We keep the sauce fast—garlic, stock, lemon, and a cold-butter swirl—so we don’t overcook the scallops while fussing with reductions.
Ingredients
Scallops & Seasoning
- 1 1/2 lblarge dry sea scallops (about 16–20), side muscles removed, patted very dry
- 1/2 tspkosher salt, plus flaky salt to finish
- 1/2 tspfreshly ground black pepper
- 2 tbspneutral oil with high smoke point (avocado or grapeseed)
Lemon Garlic Butter Sauce
- 3 tbspunsalted butter, divided
- 3garlic cloves, very finely minced
- 1/3 cuplow-sodium chicken or seafood stock
- 2 tbspfresh lemon juice, plus more to taste
- 2 tbspchopped fresh parsley
- pinchred pepper flakes (optional)
- 1 tsplemon zest (optional)
Recipe
- Prep the scallops: Place scallops on a double layer of paper towels. Pat the tops dry; flip to a fresh dry spot and pat again. Season both sides with salt and pepper right before cooking.
- Preheat the pan: Set a 12-inch stainless or cast-iron skillet over medium-high until hot—2 to 3 minutes. Add the oil and 1 tablespoon butter. When the fat shimmers and just begins to smoke, you’re ready.
- Sear side one (don’t touch): Lay scallops in a single layer with space between them. They should sing on contact. Do not move them for 2 to 3 minutes. You’re building the crust now.
- Flip & finish: Use a thin metal spatula to release and flip. Add another 1 tablespoon butter. Sear 1 to 2 minutes more to medium—opaque with a slightly translucent center. Transfer to a warm plate (tent loosely).
- Sauce: Lower heat to medium. Add remaining 1 tablespoon butter and garlic; stir 20 to 30 seconds until fragrant (not brown). Pour in stock and lemon juice; simmer 60 to 90 seconds to reduce slightly. Kill the heat; swirl in a knob of cold butter if you want extra gloss. Stir in parsley, flakes, and zest.
- Coat & serve: Return scallops to the pan just to coat (10–15 seconds). Taste the sauce; finish with a squeeze of lemon and a pinch of salt. Serve immediately.
Timing assumes dry large sea scallops. Smaller bay scallops cook in a flash—use high heat and cut the times down to seconds, not minutes.
Step-by-step cues you can see and hear
Pan readiness
Hold your hand a few inches above the pan. Hot air should rise like a chimney and you should see a whisper of heat shimmer. When the oil goes in, it should loosen and flow easily. If the oil smokes hard immediately, you’re too hot—kill the heat for a minute.
The sear soundtrack
Proper contact gives you a tight, high-pitched sizzle that stays consistent. If it hisses weakly or goes quiet, the pan cooled—either your scallops were wet or the pan is crowded. Give them more space, increase heat, and move on.
The flip test
Good crust releases easily. Don’t pry. Slide the spatula under one; if it resists, give it 15–20 seconds more. Color should be deep amber around the edges with a coin-thick browned ring—your sign you’ll keep that crust after saucing.
Doneness
Press the top with a finger. Perfectly cooked scallops feel bouncy like the fleshy base of your thumb when your hand is relaxed. Overcooked feels tense and squeaky. When in doubt, pull early; they carry to perfect in the warm pan sauce.
Searing science (what’s actually happening)
Browning is a chain of Maillard reactions—amino acids + reducing sugars + heat creating hundreds of new flavor molecules. Scallops are especially sweet, which is why their crust tastes like toasted sugar and butter when you nail it. But sugar burns fast, so control is everything. Stainless and cast-iron conduct and store heat in a way nonstick can’t, letting you maintain the narrow lane between deeply browned and scorched.
Oil + butter is a deliberate pairing. Oil raises the smoke point so you can run the pan hotter without burning milk solids; butter gives you those milk solids later, when you add a fresh knob for nutty aromas. Stock keeps the sauce savory; lemon resets richness so each bite stays bright. Swirling a final cold pat emulsifies the sauce into a glossy nappe that clings to the scallops instead of pooling thin and greasy.
Common mistakes (and blunt fixes)
- They steamed, not seared. You put in too many or they were wet. Pat dry, use a bigger pan, or cook in two batches.
- They stuck hard. Pan wasn’t hot enough or you tried to flip early. Wait for the crust to form; it naturally releases.
- Rubbery texture. You overshot the finish. Next time pull 30–45 seconds earlier. Scallops recover better underdone than over.
- Garlic turned bitter. You browned it. Garlic cooks in seconds—lower the heat and keep it blond.
Substitutions & variations
Salted, unsalted, brown butter
- Unsalted: clean control—season sauce to taste.
- Salted: fine, but taste before adding more salt.
- Brown butter: cook 2–3 minutes until nutty, then proceed; pairs well with capers and sage.
Lemon, white wine, vinegar
- Lemon: bright and simple (default).
- Dry white wine: swap half the stock for wine; simmer 2 minutes to cook off alcohol.
- Sherry vinegar: 1–2 teaspoons for a sweet-savory edge.
Customize the finish
- Red pepper flakes for a gentle kick.
- Sage, tarragon, or chives instead of parsley.
- Capers + lemon zest for piccata vibes.
High smoke point matters
- Avocado, grapeseed, or refined canola work. Olive oil burns too fast here—save it for finishing.
If you can’t find good dry scallops
- Use shrimp (16/20): 1 1/2 lb; same method, shave 30–60 seconds off the second side.
- Use thin halibut portions: 1–1 1/4 lb; sear 2–3 minutes per side and baste.
Keep the shine without butter
- Finish with 1–2 tbsp extra-virgin olive oil off heat + squeeze of lemon; skip the butter swirl.
Sides & pairings (what actually matches)
Starches
- Creamy mashed potatoes or parsnip purée (the sauce loves it).
- Buttered angel-hair with parsley and lemon zest.
- Crusty bread to mop the skillet—don’t overthink it.
Vegetables
- Asparagus, broccolini, or sautéed spinach with garlic.
- Roasted cherry tomatoes for sweet acidity.
Wine
- Sauvignon Blanc or Albariño for crisp citrus energy.
- Chablis if you want mineral and subtle oak (classic with scallops).
- Non-alcoholic: lemon seltzer with a parsley sprig.
Nutrition (estimated)
| Nutrient | Amount |
|---|---|
| Calories | ~380 kcal |
| Total Fat | 26 g |
| Saturated Fat | 12 g |
| Carbohydrates | 6 g |
| Total Sugars | 1 g |
| Protein | 30 g |
| Sodium | ~630 mg |
| Serving Size | about 6 oz scallops + sauce |
Numbers are estimates from standard databases. Your totals vary with brand, scallop size, and how much sauce you plate. Use as a guide only.
Storage & reheating
- Fridge: Scallops are best fresh. If you must save leftovers, store airtight up to 1 day with sauce.
- Reheat gently: Warm in a small skillet over low heat with a splash of stock or water until just heated through—1 to 2 minutes. Do not microwave hard; it turns them rubbery.
- Freezing: Not recommended once cooked. If starting from frozen raw scallops, thaw in the fridge overnight on paper towels.
FAQ
How do I know if my scallops are “dry” or “wet”?
“Dry” means no chemical soaking—labels may say “chemical free” or “dry packed.” Wet scallops are treated with STP; they look waterlogged and weep in the pan. Dry ones brown fast and taste sweeter.
Can I use nonstick?
You can, but the crust will be lighter. Stainless or cast-iron holds more heat and builds deeper color. If you use nonstick, get the pan truly hot and work quickly.
Why pat scallops twice?
First pat lifts surface moisture. Flipping to a dry towel exposes the underside where water pooled and pulls that off too. Two pats, two minutes, big payoff.
What size scallops are best?
Large sea scallops (U/10–U/20) are most forgiving. Tiny bay scallops are great for quick sautés but sear too fast for a thick crust.
Salt before or after?
Season right before the pan. Salt early and they leak. Finish with a pinch of flaky salt to pop the lemon butter.
Cook notes
- Ventilation matters. High heat + butter = aroma. Crack a window or run the hood.
- Metal spatula > silicone here. It sneaks under the crust without tearing it off.
- Preheat patience. Give the skillet real time. A too-cool pan is the #1 way to ruin sear.
- Plate warm. Cold plates chill the sauce fast. Warm plates make the whole thing feel “restaurant.”
- Lemon at the end. Heat flattens acidity; finish with fresh juice for a bright snap.