mini peanut butter caramel cheesecake bites
Mini Peanut Butter Caramel Cheesecake Bites
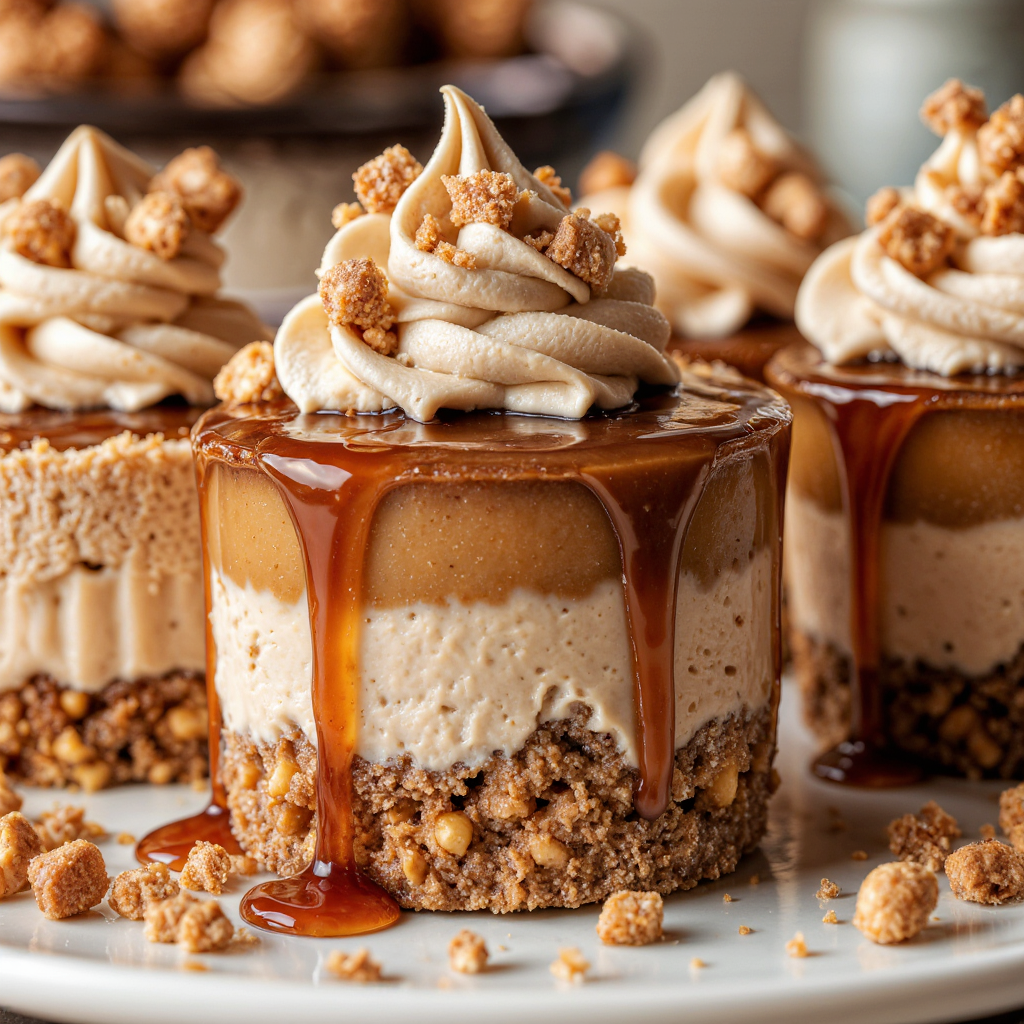
These no-bake peanut butter cheesecake bites achieve perfect texture through precise ingredient temperatures and proper aeration. The method focuses on cream cheese smoothness before sugar addition, whipped cream folding technique that maintains volume, and caramel integration that swirls without sinking. The chocolate-peanut crust provides structural integrity while complementing the creamy filling. All components work together to create individual desserts that hold their shape at room temperature while maintaining melt-in-your-mouth quality.
Why this recipe works
Temperature-controlled components. Room temperature cream cheese incorporates smoothly without lumps, while cold heavy cream whips to maximum volume. The peanut butter should be at room temperature but not oily—if natural peanut butter has separated, stir thoroughly before measuring. These temperature specifics prevent the common issues of lumpy cheesecake or deflated filling that plagues many no-bake recipes.
Dual sugar system. Powdered sugar provides smooth sweetness without graininess, while brown sugar adds moisture and caramel notes that complement the peanut butter. The small amount of brown sugar prevents the powdered sugar from making the filling too sweet while contributing to the creamy texture. This balance is crucial—too much powdered sugar makes the filling stiff; too little and it lacks structure.
Proper aeration sequence. Beating the cream cheese until completely smooth before adding other ingredients is non-negotiable. Any small lumps will remain in the final product. The whipped cream is folded in gently but thoroughly in stages to maintain air incorporation while ensuring homogeneity. This technique creates the light yet stable texture that defines professional-quality no-bake cheesecakes.
Structural crust design. The chocolate graham crumbs provide flavor harmony with the peanut butter, while the finely chopped peanuts add texture and prevent the crust from becoming monotonous. The butter quantity is calibrated to create a crust that holds together when bitten but doesn’t feel greasy or heavy. Freezing the crust before filling prevents sogginess and ensures clean layers.
Caramel viscosity management. The caramel sauce is thinned slightly with heavy cream to achieve the ideal swirling consistency—thick enough to hold its position but fluid enough to create attractive patterns without sinking to the bottom. The sea salt in the caramel mixture enhances the sweet-salty balance that makes this dessert compelling.
Ingredients (cups & tablespoons only)
Crust
- 1 1/2 cupschocolate graham cracker crumbs
- 1/3 cuproasted peanuts, finely chopped
- 1/4 cupgranulated sugar
- 1/2 cupunsalted butter, melted
Filling
- 16 ozcream cheese, room temp
- 1 cupcreamy peanut butter
- 1 cuppowdered sugar
- 1/4 cupbrown sugar, packed
- 1 tspvanilla extract
- 1/4 tspsalt
- 1 1/4 cupsheavy cream, cold
Caramel & Toppings
- 1/2 cupthick caramel sauce
- 2 tbspheavy cream
- 1/4 tspsea salt
- 1/4 cupchocolate chips, melted
- 2 tbspchopped peanuts
- —sea salt flakes for finishing
Equipment
- 124-cup mini muffin pan
- 24mini paper liners
- 1piping bag (optional)
- —toothpicks for swirling
Recipe
- Prepare pan: Line 24-cup mini muffin pan with paper liners. Ensure liners fit snugly—if they’re loose, the crust may not hold its shape properly during pressing and serving.
- Make crust: In medium bowl, combine chocolate graham crumbs, chopped peanuts, and granulated sugar. Pour melted butter over mixture and stir until all crumbs are moistened and mixture resembles wet sand.
- Press crusts: Place 1 tablespoon crust mixture into each liner. Use small glass or measuring spoon to press firmly and evenly. The crust should be compact but not overly compressed. Freeze 15 minutes to set.
- Start filling: In large bowl, beat room temperature cream cheese on medium speed until completely smooth and lump-free, about 2 minutes. Scrape bowl thoroughly.
- Add peanut butter: Add peanut butter to cream cheese and beat until fully incorporated and smooth, about 1 minute. Scrape bowl again to ensure no streaks remain.
- Add sugars and flavor: Add powdered sugar, brown sugar, vanilla, and salt. Beat on low initially to prevent sugar clouds, then increase to medium until completely smooth and creamy, about 2 minutes.
- Whip cream: In separate chilled bowl, whip cold heavy cream to stiff peaks. The cream should hold its shape when beaters are lifted. Do not overwhip to butter stage.
- Combine mixtures: Add about one-third of whipped cream to peanut butter mixture. Fold gently with spatula until mostly incorporated. Repeat with remaining cream in two additions, folding just until no white streaks remain.
- Prepare caramel: In small bowl, mix caramel sauce with 2 tablespoons heavy cream and sea salt. Stir until smooth and slightly thinned but still thick enough to hold its shape.
- Fill cups: Pipe or spoon filling into chilled crusts, filling to just below liner tops. Smooth surfaces with offset spatula or back of spoon.
- Add caramel swirl: Place small dollops of caramel mixture over filling. Use toothpick to swirl gently in figure-8 pattern. Don’t over-swirl or push too deep.
- Chill: Refrigerate cheesecakes at least 4 hours, preferably overnight. They should be firm to the touch and hold their shape when liner is peeled back slightly.
- Finish: Before serving, drizzle with melted chocolate, sprinkle with chopped peanuts and sea salt flakes. Serve chilled.
The filling will seem quite soft after assembly—this is normal. The setting happens during chilling as the fats firm up and the whipped cream stabilizes the structure.
Texture science & setting mechanisms
Cream cheese structure
Room temperature cream cheese contains emulsifiers that create smooth, stable structure when aerated. Cold cream cheese remains lumpy; too warm and it becomes greasy. The ideal temperature (65-68°F) allows proper incorporation while maintaining structural integrity.
Whipped cream function
The whipped cream introduces air bubbles that lighten the texture while the fat content helps stabilize the structure. Cold cream (below 40°F) whips best as the fat crystals hold the air bubbles. The stiff peaks provide maximum volume and stability.
Setting process
During chilling, the cream cheese fats solidify, the whipped cream stabilizes, and the sugars absorb minimal moisture to create firm yet creamy texture. The 4-hour minimum allows complete stabilization throughout each bite rather than just the surface.
Mixing methods & aeration techniques
Cream cheese foundation. Starting with completely smooth cream cheese is the most critical step. Any small lumps present at this stage will remain in the final product. Beat on medium speed for a full 2 minutes, scraping the bowl at least once. The cream cheese should be pale and noticeably increased in volume, indicating proper aeration.
Peanut butter integration. Add peanut butter only after the cream cheese is perfectly smooth. Conventional peanut butter incorporates more easily than natural varieties due to stabilizers. If using natural peanut butter, ensure it’s thoroughly stirred and at room temperature. Beat until no streaks remain, but avoid overmixing which can cause the peanut butter oils to separate.
Sugar incorporation. Start mixing on low speed when adding powdered sugar to prevent clouds of sugar dust. Once incorporated, beat on medium until the mixture is completely smooth. The brown sugar should be packed firmly into the measuring cup to ensure accurate measurement—it contributes both flavor and moisture to the filling.
Whipped cream folding. This is the most delicate stage. Use a large rubber spatula and fold gently in three additions. The first addition lightens the base mixture, making it easier to incorporate the remaining cream without deflating. Fold just until no white streaks remain—a few small streaks are preferable to overmixing and deflating the mixture.
Crust structure & pressing techniques
The crust serves both structural and flavor purposes. It must be firm enough to support the filling when bitten but not so hard that it requires excessive force. The chocolate graham base provides flavor harmony with the peanut butter, while the chopped peanuts add textural interest and prevent monotony.
Pressing methods
- Measuring spoon method: Use the back of a 1-tablespoon measuring spoon to press crust firmly into liners. The curved shape creates a natural cup for the filling.
- Small glass method: Use the bottom of a small shot glass or similar object. Provides even pressure and flat bottom surface.
- Tamper tool: If making frequently, a mini tart tamper provides the most professional results with consistent pressure and shape.
Freezing importance: The 15-minute freeze sets the butter in the crust, preventing it from becoming soggy when the filling is added. It also makes the crust easier to handle during filling and creates a distinct textural contrast between layers.
If crust mixture seems too dry, add 1 additional tablespoon melted butter. If too wet and greasy, add 1 tablespoon additional crumbs. The ideal consistency should hold together when pressed but not feel oily.
Filling balance & flavor development
The peanut butter filling achieves its perfect texture through careful balance of fats, sugars, and air. Each component serves multiple purposes in the final product.
Component functions
- Cream cheese: Primary structure, tangy flavor contrast, smooth texture base Peanut butter: Dominant flavor, additional fat content, protein for stability
- Powdered sugar: Sweetness without graininess, minor thickening from cornstarch
- Brown sugar: Moisture retention, caramel notes, flavor complexity
- Heavy cream: Lightening agent, additional fat for richness, aeration for volume
- Vanilla & salt: Flavor enhancement, balance of sweet and savory notes
The ratio of peanut butter to cream cheese is calibrated to provide strong peanut flavor without overwhelming the creamy cheesecake character. Too much peanut butter makes the filling heavy and dense; too little and it tastes like plain cheesecake with peanut undertones.
Caramel integration & swirling techniques
The caramel component adds both visual appeal and flavor complexity, but requires careful handling to prevent it from sinking or blending completely into the filling.
Caramel preparation
Thinning the caramel sauce with heavy cream achieves the ideal viscosity—thick enough to hold its position but fluid enough to swirl attractively. The sea salt enhances the sweet-salty balance. If caramel is very thick, use 3 tablespoons cream; if already thin, use only 1 tablespoon.
Swirling methods
Use a toothpick or wooden skewer for precise control. Create figure-8 patterns rather than circular motions for more attractive results. Don’t swirl too deeply or the caramel will sink to the bottom. The goal is surface decoration with some integration.
Alternative approaches
For layered effect: add half filling, drizzle caramel, add remaining filling, then swirl. For hidden center: place caramel dollop in center before adding final filling layer. For marbled effect: gently fold some caramel into filling before portioning.
Setting techniques & timing considerations
No-bake cheesecakes rely on chilling to achieve their characteristic texture. The setting process involves both temperature changes and structural stabilization.
Setting stages
- Initial set (2 hours): Surface firms up, cheesecakes can be handled gently but are still quite soft in center
- Full set (4 hours): Texture is firm throughout, liners can be removed cleanly, structure holds its shape
- Optimal texture (6+ hours/overnight): Flavors meld and mature, texture becomes creamier as ingredients fully hydrate
- Long chill (24 hours): Maximum flavor development, perfect sliceability, ideal serving temperature
Accelerated setting: For faster setting, place in freezer for 1 hour, then transfer to refrigerator. Do not freeze completely as ice crystals damage the texture. The freezer method works well when you need to serve within 2-3 hours of preparation.
If cheesecakes are still soft after 4 hours, your refrigerator may be too warm. Check temperature—ideal is 35-38°F. Also ensure proper cream whipping and ingredient measurements.
Common mistakes (and quick fixes)
- Lumpy filling: Cream cheese too cold or insufficient mixing. Ensure room temperature ingredients; beat cream cheese thoroughly before adding other components.
- Filling too soft: Under-whipped cream, overmixing, or insufficient chilling. Whip cream to stiff peaks; fold gently but thoroughly; chill full 4+ hours.
- Filling too stiff: Over-whipped cream or too much powdered sugar. Measure sugar correctly; whip cream just to stiff peaks; if already made, let sit at room temperature 10 minutes before serving.
- Crumbly crust: Too little butter or insufficient pressing. Add 1-2 tbsp additional melted butter; press crust firmly with appropriate tool.
- Soggy crust: Too much butter or filling added to warm crust. Measure butter accurately; ensure crust is chilled before filling; don’t overfill.
- Caramel sinks: Caramel too thin or swirling too deep. Thicken caramel with extra sauce; swirl only on surface; consider layering method.
- Peanut butter separation: Natural peanut butter used or overmixing. Use conventional peanut butter; mix just until combined; if separation occurs, gently fold to redistribute.
- Difficult removal: Liners sticking or filling too soft. Use quality liners; ensure full setting time; if sticking, warm slightly with hands before peeling.
Substitutions & variations
Different bases
- Oreo: use 1 1/2 cups Oreo crumbs (filling included)
- Graham: regular graham crumbs + 2 tbsp sugar
- Shortbread: crushed shortbread cookies + butter
- Nut-free: additional crumbs instead of peanuts
Different spreads
- Almond butter: use same amount
- Cookie butter: reduce sugar by 2 tbsp
- Sunflower butter: nut-free alternative
- Mixed: half peanut, half almond butter
Different profiles
- Chocolate: add 1/4 cup cocoa powder
- Banana: add 1/2 cup mashed banana
- Coffee: add 1 tbsp espresso powder
- Berry: swirl with jam instead of caramel
Allergy-friendly
- Gluten-free: use GF cookies for crust
- Dairy-free: plant-based cream cheese & cream
- Vegan: plant-based ingredients + coconut cream
- Lower sugar: reduce sugars by 25%
Different swirls
- Chocolate ganache: melted chocolate + cream
- Fruit puree: strained berry puree
- Dulce de leche: straight from can
- Nutella: slightly warmed for swirling
Different formats
- Standard muffin: make 12, increase crust to 2 tbsp
- Jar desserts: layer in small jars
- Square pan: press into 8×8, cut squares
- Tartlets: use mini tart pans
Any substitution may affect setting time, texture, and flavor balance. When making multiple substitutions, test a small batch first before committing full recipe.
Assembly & presentation techniques
Professional-looking results come from careful assembly and finishing touches. These mini cheesecakes offer multiple opportunities for attractive presentation.
Assembly methods
- Piping bag: For cleanest results, transfer filling to piping bag with large round tip. Pipe in circular motion from outside to center for smooth tops.
- Spoon method: Use two spoons to portion filling—one to scoop, one to push off. Smooth tops with offset spatula or back of spoon dipped in hot water.
- Ice cream scoop: Small (#60) scoop provides consistent portions. Release into center and spread to edges.
Finishing touches
- Chocolate drizzle: Melt chocolate chips with 1 tsp coconut oil for better flow. Use piping bag with tiny tip or zip-top bag with corner snipped.
- Nut garnish: Toast chopped peanuts briefly for enhanced flavor and crunch. Sprinkle immediately after chocolate drizzle so they adhere.
- Salt finish: Use flaky sea salt for visual appeal and flavor pops. Apply sparingly—the goal is occasional salty bursts rather than overall saltiness.
- Caramel extra: Additional caramel drizzle over finished cheesecakes adds visual appeal and reinforces the caramel flavor.
Batching & scaling
Half batch (12 bites)
- Crust: 3/4 cup crumbs
- Peanuts: 3 tbsp chopped
- Sugar: 2 tbsp
- Butter: 1/4 cup
- Cream cheese: 8 oz
- Peanut butter: 1/2 cup
- Powdered sugar: 1/2 cup
Double batch
Double all ingredients. May need to mix filling in two batches if mixer bowl is small. Use two 24-cup pans or make in stages. Setting time remains the same. Ideal for parties or gifts.
Make-ahead timeline
Complete cheesecakes: 3 days refrigerated
Filling only: 2 days refrigerated
Crust only: 2 weeks frozen
Caramel swirl: 2 weeks refrigerated
Fully assembled: 1 month frozen
Equipment notes
- Mixer types: Stand mixer ideal for cream cheese and whipping cream. Hand mixer works well but requires more attention. Can be mixed by hand but requires significant effort for proper aeration.
- Mini muffin pan: Standard 24-cup pan works best. If using silicone, place on baking sheet for stability. Ensure cups are standard mini muffin size (approximately 1 3/4-inch diameter).
- Paper liners: Quality liners prevent sticking and maintain shape. If liners are loose, double up or use foil-backed liners for better structure.
- Piping bags: Disposable bags are convenient; reusable require thorough cleaning. Large round tip (1/2-inch) works well for filling. Can use zip-top bag with corner snipped.
- Measuring tools: Digital scale most accurate for consistent results. If using cups, spoon flour and sugars into cups and level with straight edge.
- Chilling equipment: Ensure refrigerator space before starting. If space is limited, chill in batches or use freezer for initial set before transferring to refrigerator.
Nutrition (estimated per 2 bites)
| Nutrient | Amount |
|---|---|
| Calories | ~380 kcal |
| Total Fat | 26 g |
| Saturated Fat | 13 g |
| Trans Fat | 0 g |
| Cholesterol | 55 mg |
| Sodium | 220 mg |
| Total Carbohydrates | 32 g |
| Dietary Fiber | 2 g |
| Total Sugars | 25 g |
| Added Sugars | 22 g |
| Protein | 7 g |
| Vitamin D | 0.3 mcg |
| Calcium | 45 mg |
| Iron | 1 mg |
| Potassium | 180 mg |
Nutrition calculated with full-fat ingredients. Values are estimates and will vary based on specific brands and exact measurements used. Using reduced-fat cream cheese decreases calories by approximately 30 per serving and fat by 3g.
Storage & serving
- Refrigeration: Store covered in airtight container up to 5 days. Place parchment between layers if stacking. Flavors improve over first 2 days as they meld.
- Freezing: Freeze unbitten on baking sheet until solid, then transfer to airtight container. Separate layers with parchment. Keeps 1 month frozen.
- Thawing: Thaw in refrigerator overnight or at room temperature 1-2 hours. Do not microwave as it damages texture.
- Serving temperature: Best served chilled but not ice-cold. Remove from refrigerator 15-20 minutes before serving for optimal flavor and texture.
- Transport: Use insulated container with ice packs if traveling. The cheesecakes hold their shape well but should not be exposed to warm temperatures for extended periods.
- Garnish timing: Add chocolate drizzle and final garnishes within 2 hours of serving for best appearance. The garnishes can be added to frozen cheesecakes before thawing.
FAQ
Can I make these without a muffin pan?
Yes, use mini cheesecake silicone molds or arrange liners on baking sheet. The pan provides support but isn’t absolutely necessary if you’re careful when handling.
My filling is too soft after chilling—what happened?
Under-whipped cream, overmixing, warm ingredients, or insufficient chilling time. Ensure proper technique and full 4-hour chill. If still soft, they’ll still taste great but may be messy to eat.
Can I use natural peanut butter?
Yes, but ensure it’s thoroughly stirred and at room temperature. Natural peanut butters have different oil content and may require adjustment—if filling seems too soft, add 2 tbsp additional powdered sugar.
How do I get clean removal from liners?
Use quality liners, ensure full setting time, and warm slightly with your hands before peeling. If sticking persists, try foil liners or lightly spray paper liners with cooking spray before adding crust.
Can I make these ahead for a party?
Yes, they’re ideal make-ahead desserts. Prepare up to 3 days in advance, but add final garnishes within 2 hours of serving. Store covered in refrigerator.
My caramel sank to the bottom—how to prevent?
Ensure caramel is thick enough, don’t swirl too deeply, and make sure filling is properly thickened before adding caramel. You can also try the layering method: half filling, caramel, remaining filling.
Can I use cool whip instead of whipped cream?
Yes, but texture will be different. Use 8 oz thawed cool whip and fold in as you would whipped cream. The result will be lighter and less rich.
Baker notes
- Temperature control is crucial. Room temperature dairy, cold cream for whipping, and proper chilling time determine success.
- Don’t rush the cream cheese beating. Complete smoothness before adding other ingredients prevents lumps in the final product.
- Measure accurately. Especially powdered sugar and peanut butter—too much of either affects texture significantly.
- Fold gently but thoroughly. Maintain the air you’ve incorporated while ensuring complete integration of ingredients.
- Trust the setting time. The filling will seem too soft initially—this is normal. The magic happens in the refrigerator.
- Quality ingredients matter. Good peanut butter and real vanilla make a noticeable difference in the final flavor.
- Make extras. These disappear quickly and keep well, so consider making a double batch for future cravings or unexpected guests.