Mango Float Ice Cream Cake
Mango Float Ice Cream Cake
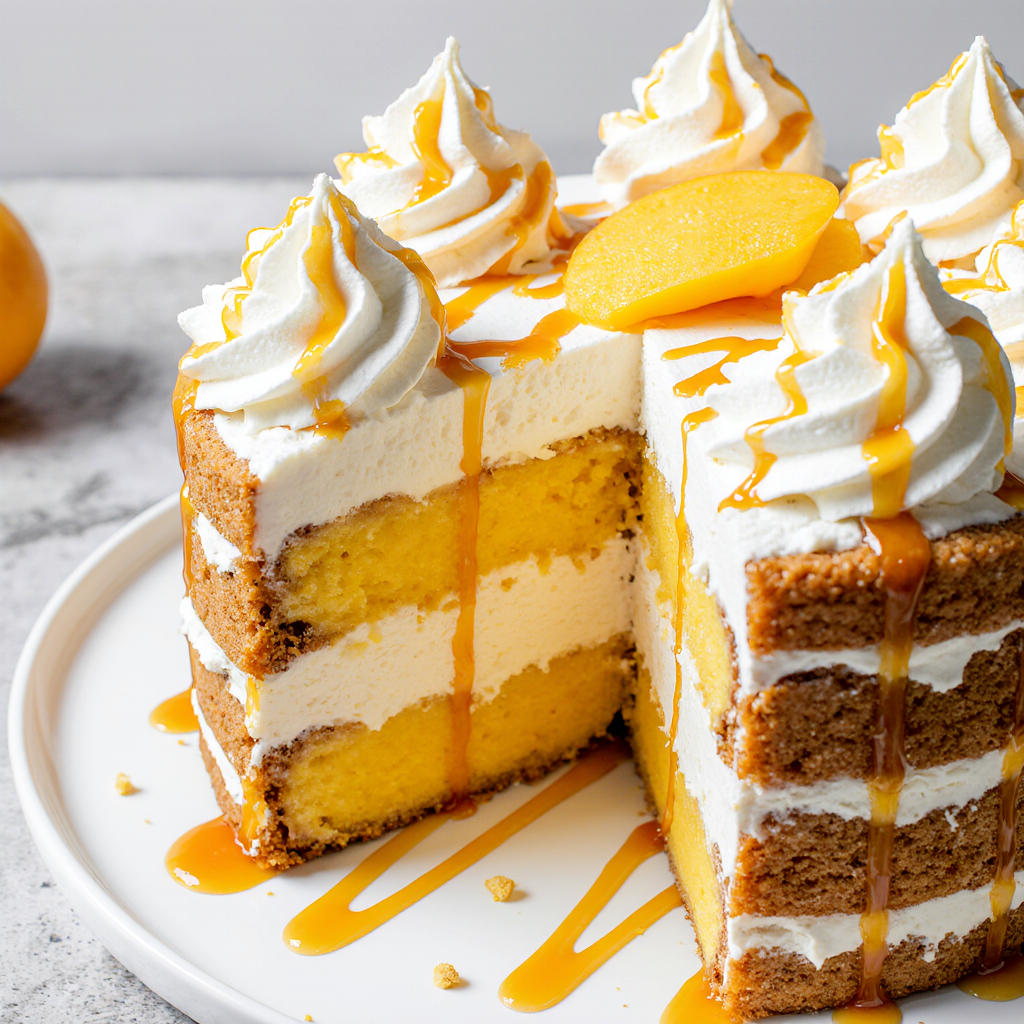
This mango float ice cream cake transforms the beloved Filipino refrigerator dessert into a show-stopping frozen masterpiece through precise layering technique and optimal mango-to-cream ratios. The method focuses on achieving perfectly stable layers that slice cleanly, using whipped cream stabilization and strategic graham cracker placement to create distinct textural zones. Fresh mango puree integration ensures authentic tropical flavor throughout, while the frozen format eliminates the traditional soggy cracker problem. The result is a make-ahead dessert with creamy mango layers, crisp graham texture, and condensed milk sweetness that delivers tropical indulgence in every perfectly structured slice.
Why this recipe works
Frozen format solves the soggy problem. Traditional mango float suffers from graham crackers becoming unpleasantly mushy after sitting in the refrigerator. Freezing the dessert maintains textural integrity by keeping the crackers firm and crisp even after extended storage. The frozen temperature slows moisture migration from the cream into the crackers, preserving the essential textural contrast between creamy layers and crunchy graham. This transformation from refrigerator dessert to freezer cake elevates the eating experience while maintaining authentic Filipino flavor profiles. The 6-hour minimum freeze time ensures complete solidification for clean slicing.
Whipped cream stabilization technique. Whipping heavy cream to stiff peaks before folding in condensed milk creates a stable structure that holds its shape when frozen and sliced. The air incorporated during whipping acts as insulation, preventing ice crystal formation that would create grainy texture. The 3:1 ratio of heavy cream to condensed milk provides optimal sweetness while maintaining enough fat content for smooth, scoopable consistency. Stiff peaks are crucial – under-whipped cream will weep moisture and create icy layers, while the proper consistency creates that signature creamy-dreamy mango float texture in frozen form.
Fresh mango integration strategy. Using both mango puree and diced fresh mango creates complex flavor and texture throughout every layer. The puree blends seamlessly into the whipped cream base, distributing tropical flavor uniformly, while diced mango pieces provide bursts of fresh fruit texture and visual appeal. The 1 cup puree to 4 cups diced ratio ensures mango presence in every bite without overwhelming the cream’s smooth texture. Fresh ripe mangoes are essential – their natural sweetness and fiber structure hold up better during freezing than canned alternatives, which can become watery and bland.
Graham cracker barrier system. Whole graham crackers create distinct layers that provide structural support and textural contrast in the frozen cake. Breaking crackers to fit ensures complete coverage without gaps that would allow cream layers to merge together. The crackers absorb just enough moisture to soften slightly while maintaining their integrity, creating that perfect balance between crisp and tender. The starch in the crackers also absorbs excess liquid, preventing ice crystal formation at layer boundaries. Using full sheets rather than crumbs maintains architectural structure that allows clean slicing.
Condensed milk sweetener science. Sweetened condensed milk serves triple duty as sweetener, flavor enhancer, and texture modifier. Its high sugar content lowers the freezing point of the cream mixture, preventing the dessert from becoming rock-hard in the freezer. The milk proteins add richness and help stabilize the whipped cream structure. The caramelized milk sugars contribute deep, complex sweetness that complements mango’s bright tropical notes. The 14-ounce can ratio provides optimal sweetness without making the dessert cloying, while the extra drizzle on top adds visual appeal and flavor intensity.
Ingredients (cups & tablespoons only)
Cream Base
- 3 cupsheavy whipping cream (cold)
- 1 can (14 oz)sweetened condensed milk
- 1 tspvanilla extract
- 1 cupmango puree (fresh or frozen)
Layers & Garnish
- 4 cupsfresh ripe mangoes, diced
- 2 packagesgraham crackers (14 oz each)
- 1/2 cupcondensed milk for drizzle
- As neededfresh mango slices
- As neededfresh mint leaves
Recipe
- Prep pan: Line 9×13 inch baking pan with parchment paper, leaving 2-inch overhang on both long sides. This creates handles for easy removal after freezing.
- Whip cream base: In large chilled bowl, beat 3 cups cold heavy cream with electric mixer on medium-high speed until stiff peaks form, about 4-5 minutes. Peaks should stand straight up when beaters are lifted.
- Fold in sweeteners: Reduce speed to low. Add entire can of condensed milk (14 oz) and 1 tsp vanilla extract. Fold gently with rubber spatula until just combined – don’t deflate the whipped cream.
- Add mango puree: Pour in 1 cup mango puree and fold gently until evenly distributed and cream turns pale yellow-orange. Mixture should be smooth and fluffy.
- Incorporate fresh mango: Fold in 4 cups diced fresh mango, reserving 1/2 cup for top garnish. Mix gently to distribute mango pieces evenly throughout cream.
- Create first layer: Spread thin layer (about 1 cup) of mango cream mixture on bottom of prepared pan, creating even base layer.
- Add first cracker layer: Arrange single layer of whole graham crackers over cream, breaking crackers as needed to fit pan completely with minimal gaps. Crackers should cover entire surface.
- Build layers: Spread thick layer of mango cream (about 2 cups) over graham crackers, smoothing to edges. Repeat layering – graham crackers then cream – 2-3 more times depending on pan depth. Aim for 4-5 total cracker layers.
- Top cream layer: Spread final layer of mango cream on top, smoothing surface completely. This top layer should be generous (remaining cream) for impressive height.
- Add final touches: Drizzle 1/2 cup condensed milk decoratively over top. Arrange reserved diced mango pieces and fresh mango slices in attractive pattern on surface.
- Freeze solid: Cover tightly with plastic wrap, pressing directly onto surface to prevent ice crystals. Freeze minimum 6 hours, preferably overnight (8-12 hours) until completely firm throughout.
- Slice and serve: Remove from freezer 10 minutes before serving. Lift entire cake from pan using parchment handles. Place on cutting board. Use sharp knife dipped in hot water and wiped clean between cuts. Slice into 12 squares.
- Garnish: Top each slice with additional fresh mango slice and mint leaf just before serving for fresh presentation.
The cake is easiest to slice when very cold but will soften quickly at room temperature. Work fast during slicing and return remaining portions to freezer immediately. If cake becomes too soft during slicing, return to freezer for 10-15 minutes to firm up.
Nutrition (estimated per slice)
| Nutrient | Amount |
|---|---|
| Calories | ~380 kcal |
| Total Fat | 18 g |
| Saturated Fat | 11 g |
| Trans Fat | 0 g |
| Cholesterol | 65 mg |
| Sodium | 140 mg |
| Total Carbohydrates | 52 g |
| Dietary Fiber | 1 g |
| Total Sugars | 38 g |
| Added Sugars | 28 g |
| Protein | 4 g |
| Vitamin A | 850 IU |
| Vitamin C | 35 mg |
| Calcium | 95 mg |
| Iron | 0.5 mg |
Nutrition calculated for 12 equal slices from 9×13 pan. Values include all layers and garnishes. Mangoes contribute vitamins A and C. Using light cream or reduced-fat condensed milk will lower calorie and fat content.
Mango selection & preparation
Mango varieties
Manila/Champagne: small, sweet, fiberless – ideal for this recipe. Ataulfo: golden, creamy, low-fiber. Haden: classic, good flavor. Kent: large, juicy. Tommy Atkins: common, more fibrous. Choose fragrant mangoes that yield slightly to gentle pressure.
Ripeness indicators
Sweet aroma at stem end: ready. Slight give when squeezed: perfect. Wrinkled skin near stem: overripe but still usable for puree. Green hard fruit: needs 2-5 days at room temp. Red blush doesn’t indicate ripeness – some varieties stay green when ripe.
Cutting techniques
Stand mango on end, slice off “cheeks” on either side of flat pit. Score flesh in crosshatch pattern without cutting through skin. Push skin up to invert, cut cubes off skin. Trim remaining flesh from pit. For puree, blend cubes until smooth, strain if fibrous.
Cream science & whipping technique
Understanding cream structure and proper whipping technique is essential for creating the stable, smooth layers that define this frozen dessert’s luxurious texture.
Whipping stages
- Soft peaks (2-3 minutes): Cream starts to thicken, peaks droop when beaters lift. Not ready yet – continue beating.
- Medium peaks (3-4 minutes): Peaks hold shape but tips curl over. Getting close – watch carefully from this point.
- Stiff peaks (4-5 minutes): Peaks stand straight up, cream looks glossy and smooth. Perfect stage – stop immediately.
- Over-whipped (5+ minutes): Cream looks grainy, starts to separate into butter and liquid. Ruined – must start over with fresh cream.
Temperature control
Cold temperature is crucial for successful whipping. Chill mixing bowl and beaters in freezer for 15 minutes before starting. Use heavy cream straight from refrigerator – it should be 35-40°F. Cold fat molecules trap air more effectively, creating stable structure. Warm cream won’t whip properly and will result in thin, runny mixture that won’t hold layers.
Fat content matters
Heavy whipping cream (36-40% fat) is essential – don’t substitute half-and-half, light cream, or whipping cream with lower fat content. The high fat percentage creates rich flavor and stable structure that holds up to freezing. Lower fat options will create icy, grainy texture and won’t slice cleanly. The fat also prevents ice crystal formation during freezing.
Professional tip: Add 2 tablespoons powdered sugar to cream before whipping for extra stability. The cornstarch in powdered sugar acts as stabilizer, helping cream maintain structure longer. This is especially helpful if making ahead or if kitchen is warm.
Layering techniques for perfect structure
Strategic layering creates the signature striped appearance and ensures every slice includes optimal ratios of cream, mango, and graham cracker crunch.
Layer order strategy
Start with thin cream base to prevent crackers from touching pan directly. Alternate thick cream layers (2 cups each) with complete cracker coverage. Aim for 4-5 cracker layers total. End with generous cream layer on top for impressive height and clean presentation.
Cracker placement
Use whole crackers broken to fit rather than crushing. Arrange in single layer with minimal gaps – small spaces are fine, large gaps will cause cream layers to merge. Press gently into cream below to adhere. Overlap slightly at edges if needed for complete coverage.
Cream spreading
Use offset spatula for smoothest layers. Spread from center outward, pushing cream to edges. Each cream layer should be 3/4 to 1 inch thick. Don’t press down hard or you’ll compress lower layers. Smooth top completely for professional appearance.
Visual layer guide
Bottom to top in 9×13 pan: (1) Thin cream base, (2) Graham crackers, (3) Thick cream with mango, (4) Graham crackers, (5) Thick cream with mango, (6) Graham crackers, (7) Thick cream with mango, (8) Graham crackers, (9) Final thick cream layer with condensed milk drizzle and mango garnish. This creates 4 cracker layers and 5 cream layers for optimal texture balance.
Freezing methods & texture optimization
Proper freezing technique determines final texture quality, ensuring creamy consistency without ice crystals or freezer burn during storage.
Freezing timeline
- First 2 hours: Surface begins to firm, edges solidify first. Don’t disturb – moving pan creates cracks in surface.
- Hours 2-4: Cream layers set, crackers begin to absorb moisture and soften slightly. Center remains softer than edges.
- Hours 4-6: Complete solidification occurs throughout. Knife should leave clean cut through all layers. Minimum recommended time.
- Hours 6-12: Optimal texture develops. Flavors meld beautifully. Crackers achieve perfect semi-soft texture. Best serving window.
- After 12 hours: Fully frozen, can be stored long-term. Texture remains excellent for up to 2 weeks with proper wrapping.
Ice crystal prevention
Press plastic wrap directly onto surface before covering pan – this prevents air exposure that causes ice crystals and freezer burn. Use high-quality plastic wrap or freeze in airtight container if transferring. Avoid temperature fluctuations by keeping freezer at consistent 0°F or below. Don’t store near freezer door where temperature varies. These techniques maintain smooth, creamy texture throughout storage.
Quick-freeze method
For faster results, place pan on flat surface in coldest part of freezer (usually back bottom). Ensure freezer isn’t overpacked – good air circulation speeds freezing. Don’t stack anything on top until completely frozen. If you have a blast chiller or deep freeze setting, use it for first 2 hours to accelerate surface setting.
Common mistakes (and solutions)
- Icy, grainy texture: Cream wasn’t whipped to stiff peaks or wasn’t cold enough. Always chill equipment and beat to proper consistency. If already made, let soften slightly before serving – graininess is less noticeable at warmer temperature.
- Layers bleeding together: Insufficient graham cracker coverage or gaps between crackers. Use more crackers and break to fit completely. If already assembled, it will still taste delicious even without distinct layers.
- Too soft to slice: Insufficient freezing time or freezer temperature too warm. Freeze additional 2-4 hours. Check freezer thermostat – should be 0°F or below. Very soft cake can be scooped into bowls instead of sliced.
- Cream deflated during mixing: Over-folding or adding ingredients too quickly. Fold gently with lifting motion. If deflated, cake will be denser but still flavorful. Add 15 minutes to freezing time for proper firmness.
- Crackers too hard: Over-frozen or insufficient moisture in cream layers. Let stand at room temperature 15 minutes before serving. For future batches, use slightly thicker cream layers to add moisture.
- Mango flavor too mild: Underripe mangoes or insufficient puree. Use riper fruit and increase puree by 1/4 cup. Can fold in mango extract (1/2 tsp) to boost flavor if already made.
- Difficult to remove from pan: Parchment overhang too short or stuck to sides. Run knife around edges to loosen. Use longer parchment strips next time for easier lifting. Can also serve directly from pan if removal proves impossible.
- Top layer cracking: Too much condensed milk drizzle or over-freezing. Cracks are cosmetic only – cover with extra mango garnish. For smooth top, reduce drizzle and freeze no longer than 12 hours before serving.
Substitutions & variations
Different fruits
- Strawberries: classic Filipino alternative
- Peaches: summer stone fruit
- Mixed berries: colorful option
- Pineapple: tropical cousin
- Passion fruit: tangy twist
Different bases
- Coconut cream: dairy-free tropical
- Mascarpone blend: richer texture
- Greek yogurt: tangy, lighter
- Cream cheese: denser, cheesecake-like
- Evaporated milk: lighter option
Different bases
- Vanilla wafers: sweeter, lighter
- Ladyfingers: tiramisu-style
- Shortbread: buttery richness
- Maria cookies: traditional Filipino
- Digestive biscuits: British twist
Add-ins & spices
- Lime zest: citrus brightness
- Coconut flakes: tropical depth
- Rum extract: island flair
- Cardamom: aromatic warmth
- White chocolate: creamy richness
Special diets
- Vegan: coconut cream + dairy-free condensed milk
- Reduced sugar: sugar-free condensed milk
- Gluten-free: GF graham crackers
- Lactose-free: lactose-free cream
- Lower fat: light cream + gelatin stabilizer
Serving formats
- Individual cups: portion control
- Round cake pan: celebration style
- Loaf pan: easy slicing
- Trifle bowl: show-off layers
- Ice cream sandwiches: handheld
When substituting fruits, adjust sweetness based on natural sugar content. Tart fruits may need additional sugar, while very sweet fruits can use less condensed milk. Different crackers absorb moisture at different rates – adjust freeze time accordingly.
Serving & presentation ideas
Plating techniques
Square slices: modern, clean-cut. Scooped portions: rustic, casual. Layered parfaits: deconstructed style. Triangle cuts: elegant, maximizes servings. Round cookie-cutter portions: whimsical presentation. Serve on chilled plates for slower melting.
Garnish options
Fresh mango roses: impressive centerpiece. Toasted coconut flakes: textural contrast. Crushed graham crackers: extra crunch. Edible flowers: tropical elegance. Lime wheels: citrus pop. Mint sprigs: color and freshness. Caramel drizzle: decadent touch.
Occasion styling
Birthday: candles in top layer. Summer party: tropical fruit array. Holidays: festive cookie cutters. Brunch: individual glasses. Potluck: serve from pan. Wedding: tiered presentation. Kids’ party: colorful sprinkles. Each creates unique experience.
Timing for serving
Remove from freezer exactly 10 minutes before slicing for easiest cutting. Frozen solid = hard to cut. Room temp 5 minutes = slightly easier. Room temp 10 minutes = optimal – cuts clean but doesn’t melt. Room temp 15+ minutes = too soft, loses shape. Work quickly during serving, returning unused portions to freezer immediately.
Equipment notes
- Baking pan: 9×13 inch metal or glass pan works best. Metal freezes faster and conducts cold better. Glass allows viewing layers from sides. Avoid dark non-stick which can make slicing difficult. Ensure pan has straight sides for clean layer edges.
- Electric mixer: Stand mixer with whisk attachment ideal for large volume. Hand mixer works but takes longer – use high speed. Balloon whisk and arm strength possible but exhausting. Cream must reach stiff peaks for proper structure.
- Mixing bowls: Large bowl (5+ quart capacity) essential for whipping 3 cups cream. Metal or glass bowls chill better than plastic. Chilling bowl in freezer 15 minutes before use significantly improves whipping results.
- Rubber spatula: Large flexible spatula crucial for folding without deflating cream. Silicone resists staining from mango. Use gentle folding motion from bottom to top, rotating bowl. Small spatula works for spreading layers.
- Offset spatula: Creates smoothest, most professional layers. 6-8 inch blade length ideal for 9×13 pan. Angled blade glides over surface without digging into cream below. Not essential but makes significant difference in appearance.
- Sharp knife: Long thin blade (10+ inches) cuts cleanest slices. Chef’s knife or bread knife both work. Dip in hot water and wipe clean between each cut for professional edges. Serrated knife can crush layers – use smooth blade.
- Parchment paper: Creates easy-lift handles for removing frozen cake. Cut strips 2 inches wider than pan on each side. Press into corners and smooth against sides. Can substitute aluminum foil but parchment preferred for non-stick properties.
Storage & make-ahead tips
- Freezer storage: Store tightly wrapped up to 2 weeks for best quality. After 2 weeks, texture remains good but mango flavor begins to fade. After 1 month, ice crystals may form despite wrapping. Label with date for tracking.
- Wrapping technique: Press plastic wrap directly onto surface to eliminate air pockets. Wrap entire pan with second layer of plastic or aluminum foil. For longest storage, place wrapped pan in freezer-safe zip-top bag. Remove as much air as possible before sealing.
- Portioning before freezing: Slice into individual portions after initial 6-hour freeze, then wrap each slice separately in plastic wrap. Store wrapped slices in freezer container. Perfect for grab-and-go servings or controlling portions. Slices thaw faster than whole cake.
- Make-ahead timeline: Can prepare cream mixture and cut graham crackers 1 day ahead – store separately in refrigerator. Assemble and freeze up to 2 weeks before serving. Best within first week after making. Don’t add fresh fruit garnish until serving day.
- Thawing guidelines: Never thaw completely – serve frozen or slightly softened. Room temperature 10 minutes = ideal. Refrigerator 30 minutes = too soft, loses structure. Microwave = never, creates soupy mess. Once thawed, do not refreeze – texture will be ruined.
- Leftovers handling: Cover exposed areas with plastic wrap pressing directly onto surface. Return to freezer immediately after serving. Texture degrades slightly with each freeze-thaw cycle. Best consumed within 3 days after first slicing for optimal quality.
Frequently asked questions
Can I use canned mango instead of fresh?
Yes, but drain very well and pat completely dry with paper towels. Canned mango has more liquid that can create ice crystals. Use the same measurements – 4 cups diced and 1 cup pureed. The flavor will be slightly less vibrant but still delicious. Avoid mango packed in heavy syrup which is too sweet.
Why did my cream layers turn icy instead of creamy?
This happens when cream isn’t whipped to stiff peaks before folding in other ingredients, or if too much liquid was added from watery mangoes. The solution is ensuring proper whipping technique and draining excess mango juice. If already made, let sit at room temperature 10-15 minutes before serving to soften icy texture.
Can I make this without condensed milk?
Condensed milk is essential for authentic flavor and texture, but you can make your own by simmering 2 cups whole milk with 3/4 cup sugar until reduced by half (about 45 minutes). Cool completely before using. The commercial version is more convenient and has better consistency.
How do I prevent the top from cracking when frozen?
Cover with plastic wrap pressed directly onto the cream surface immediately after assembling. Minimize temperature fluctuations by keeping freezer door closed. Some minor cracking is normal and can be covered with garnishes. Cracks don’t affect taste or structure.
Can I make individual portions instead of one large cake?
Absolutely! Use 8-12 small glasses, mason jars, or dessert cups. Layer graham crackers broken into pieces with mango cream. Freeze minimum 4 hours. Individual portions thaw faster and are perfect for parties. They also photograph beautifully showing off the layers.
What’s the difference between mango float and this ice cream cake?
Traditional mango float is refrigerated and eaten within 24 hours while crackers are still slightly crisp. This frozen version can be made weeks ahead and maintains perfect texture indefinitely. The freezing process creates ice cream cake consistency while preventing soggy crackers. Both are delicious but serve different purposes.
My mangoes aren’t sweet enough – can I add sugar?
Yes, add 2-4 tablespoons granulated sugar to the diced mangoes and let macerate 15 minutes before folding into cream. This draws out juices and sweetens the fruit. You can also add extra condensed milk (2-4 tablespoons) to the cream base for overall sweetness boost.
Cook notes & pro tips
Cultural context
Mango float is beloved Filipino icebox dessert traditionally served at celebrations and family gatherings. This frozen adaptation maintains authentic flavors while solving traditional texture issues. In Philippines, refrigerated version called “ref cake” is more common, but frozen version becoming popular worldwide.
Seasonal timing
Peak mango season is April-September for best fresh fruit. Off-season, frozen mango works beautifully and often costs less. Philippine manila mangoes (champagne mangoes) are ideal variety when available. Mexican Ataulfo mangoes are excellent year-round substitute.
Scaling recipe
Half recipe fits 8×8 pan perfectly (6-8 servings). Double recipe fills two 9×13 pans (24 servings) – ideal for large gatherings. Triple recipe makes stunning sheet cake presentation. Keep proportions consistent for best results. Freeze time remains the same regardless of size.
Troubleshooting texture
Perfect texture should be creamy-smooth when cut, similar to no-churn ice cream. If too hard, your freezer may be too cold – let stand at room temp 15 minutes. If too soft, freezer isn’t cold enough or cake needs more freeze time. If grainy, cream wasn’t whipped properly or mangoes added too much liquid. Each issue has solution but prevention through proper technique is always best approach.