Key Lime Pie Cheesecake Bars
Key Lime Pie Cheesecake Bars
These key lime pie cheesecake bars achieve perfect texture and flavor balance through precise cream cheese temperature control, proper gelatin incorporation, and careful crust preparation. The method focuses on creating a no-bake cheesecake filling that sets firmly enough for clean bar slices while maintaining the creamy, luxurious mouthfeel of traditional cheesecake. The result is professional-quality dessert bars with striking visual appeal from the layered presentation, balanced sweet-tart flavor profile that highlights the distinctive key lime flavor, and technical precision that ensures consistent setting and slicing properties.
Why this recipe works
Crust structure and binding science. The 2:1 ratio of graham cracker crumbs to melted butter creates a crust that’s firm enough to support the filling while remaining tender and easy to cut. The 1/4 cup sugar provides just enough sweetness to complement the tangy filling without competing with it. The 15-minute freezer chilling sets the butter quickly, creating a stable base that won’t crumble when sliced. Unlike baked crusts, this no-bake version maintains a softer texture that contrasts beautifully with the creamy filling. The pressed (not packed) application technique ensures the crust is dense enough to hold together but not so compact that it becomes hard.
Cream cheese emulsion and aeration. Properly softened cream cheese (68-70°F) creates a smooth base that accepts the other ingredients without lumps. The gradual incorporation of powdered sugar (rather than granulated) prevents graininess and dissolves completely into the fat base. The 3-4 minute beating time incorporates just enough air to create lightness without making the filling unstable. The sour cream addition provides tang that enhances the key lime flavor while contributing to the smooth, creamy texture. The careful balance of dairy fats creates a rich mouthfeel that mimics traditional baked cheesecake.
Gelatin incorporation and setting properties. The single packet of unflavored gelatin provides the structural integrity needed for clean bar slices while maintaining a creamy texture. The blooming process (hydrating in cold water) ensures even distribution and prevents clumping. The gentle heating dissolves the gelatin completely without compromising its setting power. The timing of gelatin addition (after other ingredients are combined but before final mixing) ensures even distribution throughout the filling. The 6-hour chilling time allows for complete setting without the rubbery texture that can occur with excessive gelatin.
Key lime flavor layering and balance. Using both key lime juice and zest provides complete citrus flavor – the juice delivers tartness while the zest contributes aromatic oils. The 1/2 cup juice to 1 tablespoon zest ratio creates bright, authentic key lime flavor without overwhelming bitterness. The combination of heavy cream and sour cream balances the acidity, preventing the filling from becoming too sharp. The minimal sugar allows the distinctive key lime flavor to shine while providing just enough sweetness to balance the tartness. This careful balancing creates a sophisticated flavor profile that’s neither cloyingly sweet nor unpleasantly sour.
Whipped cream integration and texture control. Whipping the heavy cream to stiff peaks before folding provides the aeration that gives the filling its light, creamy texture. The gentle folding technique preserves the air bubbles while ensuring even distribution. The whipped cream lightens what would otherwise be a dense filling, creating the perfect balance between richness and levity. The temperature control (cold bowl, cold cream) ensures maximum volume and stability. This aeration method creates a texture closer to traditional cheesecake than typical no-bake versions.
Ingredients (cups & tablespoons only)
Graham Cracker Crust
- 2 cupsgraham cracker crumbs
- 1/2 cupunsalted butter, melted
- 1/4 cupgranulated sugar
Key Lime Cheesecake Filling
- 16 ozcream cheese, softened
- 1 cuppowdered sugar
- 1/2 cupkey lime juice
- 1 tbspkey lime zest
- 1 cupheavy cream
- 1/4 cupsour cream
- 1 tspvanilla extract
- 1 packetunflavored gelatin
- 1/4 cupcold water
For Garnish
- 1 cupwhipped cream
- 4-6 sliceslime slices
- 2 tsplime zest
Recipe
- Prepare pan: Line 9×9 inch baking pan with parchment paper, leaving overhang on two sides for easy removal. Lightly grease exposed pan areas.
- Make crust: Combine 2 cups graham cracker crumbs, 1/4 cup sugar, and 1/2 cup melted butter until mixture resembles wet sand.
- Press crust: Transfer crumb mixture to prepared pan. Press firmly into even layer using flat-bottomed cup or measuring cup. Don’t compact too tightly.
- Chill crust: Place crust in freezer for 15 minutes to set while preparing filling. This prevents crust from mixing with filling.
- Bloom gelatin: Sprinkle 1 packet gelatin over 1/4 cup cold water in small bowl. Let stand 5 minutes until gelatin granules swell and absorb water.
- Dissolve gelatin: Microwave gelatin mixture for 15 seconds until liquid and clear. Alternatively, heat over double boiler. Stir to ensure complete dissolution.
- Beat cream cheese: In large bowl, beat 16 oz softened cream cheese with 1 cup powdered sugar until completely smooth, about 3-4 minutes. Scrape bowl frequently.
- Add flavorings: Reduce mixer speed to low and add 1/2 cup key lime juice, 1 tbsp zest, 1/4 cup sour cream, and 1 tsp vanilla. Mix until fully incorporated.
- Whip cream: In separate chilled bowl, whip 1 cup heavy cream to stiff peaks. Be careful not to overwhip or cream will become grainy.
- Combine mixtures: Gently fold whipped cream into cream cheese mixture using rubber spatula. Stop when no white streaks remain.
- Incorporate gelatin: While mixing on low speed, slowly stream in dissolved gelatin. Mix just until combined, about 30 seconds.
- Assemble bars: Pour filling over chilled crust. Spread evenly with offset spatula. Tap pan gently on counter to remove air bubbles.
- Chill completely: Refrigerate for at least 6 hours or overnight until completely set. Cover with plastic wrap once surface is firm.
- Slice and serve: Use parchment overhang to lift bars from pan. Cut into 16 squares with hot, clean knife. Garnish with whipped cream and lime slices.
The filling will be soft after initial mixing but firms up significantly during chilling. For cleanest slices, ensure bars are completely set. Wipe knife clean between cuts and consider dipping in hot water for smoothest edges. The bars will soften at room temperature, so serve promptly after cutting.
Nutrition (estimated)
| Nutrient | Amount |
|---|---|
| Calories | ~320 kcal |
| Total Fat | 22 g |
| Saturated Fat | 13 g |
| Trans Fat | 0.5 g |
| Cholesterol | 65 mg |
| Sodium | 180 mg |
| Total Carbohydrates | 28 g |
| Dietary Fiber | 1 g |
| Total Sugars | 22 g |
| Added Sugars | 18 g |
| Protein | 4 g |
| Vitamin D | 0.6 mcg |
| Calcium | 55 mg |
| Iron | 1 mg |
| Potassium | 95 mg |
Nutrition calculated with standard ingredient measurements and includes crust and filling. Values are estimates and will vary based on specific brands and exact measurements. Using reduced-fat cream cheese will lower fat content by approximately 6g per bar.
Crust science & texture principles
Crumb binding
Butter acts as primary binder. Sugar adds crispness. Proper ratio prevents crumbling. Even pressing creates uniform base. Chilling sets structure. Correct thickness supports filling.
Alternative crusts
Shortbread cookies: buttery base. Vanilla wafers: neutral flavor. Gingersnaps: spicy contrast. Coconut cookies: tropical pairing. Chocolate grahams: rich variation. Nut crusts: gluten-free option.
Texture balance
Crust should be firm but tender. Too hard: difficult to cut. Too soft: mixes with filling. Proper pressing technique crucial. Chilling time affects final texture. Ratio determines structural integrity.
Filling science & emulsion techniques
Creating the perfect no-bake cheesecake filling requires precise temperature control, proper ingredient incorporation order, and careful aeration to achieve a smooth, creamy texture that sets firmly while maintaining luxurious mouthfeel.
Filling preparation science
- Cream cheese temperature: Must be at 68-70°F for smooth incorporation. Cold cream cheese creates lumps that won’t incorporate properly. Too warm and the filling becomes unstable and may not set properly.
- Sugar selection: Powdered sugar dissolves completely into the fat base, preventing graininess. The cornstarch in powdered sugar also contributes to the setting properties and smooth texture.
- Acid management: The key lime juice provides necessary acidity for flavor but must be added after the cream cheese and sugar are fully combined to prevent curdling or separation.
- Aeration technique: Proper whipping of the heavy cream creates the light texture. Underwhipped cream doesn’t provide enough lift, while overwhipped cream becomes grainy and difficult to incorporate.
- Folding method: The whipped cream must be folded gently to maintain air bubbles. Aggressive mixing deflates the filling, resulting in a dense final product.
The filling will appear quite soft after mixing but firms up significantly during chilling. Do not be tempted to add extra gelatin – the single packet provides the perfect balance between sliceability and creamy texture when given adequate setting time.
Gelatin science & setting properties
Gelatin provides the structural framework that allows these no-bake bars to hold their shape while maintaining a creamy, non-rubbery texture through proper hydration, dissolution, and incorporation techniques.
Gelatin hydration
Cold water allows proper blooming. 5 minutes minimum hydration time. Granules should swell completely. Incomplete blooming causes lumps. Proper ratio ensures correct set.
Dissolution techniques
Low heat prevents protein damage. Microwave in short bursts. Double boiler for precision. Must become completely liquid. Stirring ensures even distribution. Temperature control crucial.
Incorporation timing
Add after other ingredients combined. Stream in while mixing. Avoid overmixing after addition. Quick incorporation prevents premature setting. Even distribution ensures uniform texture.
Flavor balancing & citrus science
Creating the perfect key lime flavor profile requires understanding citrus chemistry, sweetness balancing, and how different dairy components interact with acidic ingredients to create a harmonious final product.
Flavor development principles
- Key lime characteristics: True key limes are more aromatic and complex than regular limes. They have higher acidity but also floral notes that distinguish them. The smaller size means more surface area for zest relative to juice.
- Zest vs juice chemistry: Lime zest contains aromatic oils (limonene) that provide fragrance and top notes. The juice provides acidity and tartness. Using both creates complete citrus flavor profile.
- Acid-fat interaction: The acidity from lime juice would normally cause dairy to curdle, but the high fat content in cream cheese and heavy cream protects against this. The gradual incorporation allows the acids to be safely dispersed throughout the fat matrix.
- Sweetness balancing: The powdered sugar provides sweetness that balances the lime’s acidity without overwhelming it. The 1:2 ratio of sugar to lime juice creates the classic sweet-tart balance that defines key lime desserts.
- Flavor maturation: The lime flavor intensifies and mellows during the chilling period. The acids have time to fully integrate with the dairy components, creating a more harmonious flavor profile than freshly mixed filling.
The distinctive key lime flavor comes from the combination of high acidity and complex aromatic compounds. While regular limes can be substituted, the flavor profile will be different – more straightforwardly tart without the floral, complex notes that make key limes special.
Common mistakes (and quick fixes)
- Lumpy filling: Cream cheese too cold or insufficient mixing. Ensure proper softening, beat longer. If lumps remain, press through sieve or use immersion blender.
- Bars not setting: Insufficient gelatin or chilling time. Ensure proper gelatin measurement, chill full 6 hours. If still soft, freeze 1 hour before serving.
- Crumbly crust: Insufficient butter or improper pressing. Add more melted butter, press more firmly. If already made, press crumbs back into place.
- Filling separation: Overmixing or temperature shock. Mix gently, ensure ingredients similar temperature. If separated, whisk vigorously to recombine.
- Too tart: Excessive lime juice or insufficient sugar. Balance with additional powdered sugar. Serve with sweetened whipped cream to counter acidity.
- Rubbery texture: Too much gelatin or overmixing after addition. Use exact gelatin measurement, mix minimally after adding. If rubbery, serve slightly warmer.
- Crust sticking: Insufficient pan preparation. Always use parchment paper. If stuck, warm bottom briefly with warm towel or hairdryer.
- Weeping filling: Temperature fluctuation or incomplete setting. Chill completely without disturbance. If weeping occurs, blot moisture with paper towel.
Substitutions & variations
Different citrus
- Lemon: classic alternative
- Orange: sweeter profile
- Grapefruit: sophisticated bitter
- Blood orange: dramatic color
- Yuzu: exotic Japanese
- Mixed citrus: complexity
Different crusts
- Shortbread: buttery base
- Biscoff: caramel spice
- Gingersnap: warm spice
- Coconut: tropical pairing
- Chocolate: rich contrast
- Nut flour: gluten-free
Different fillings
- Vegan: cashew base
- Greek yogurt: tangy light
- Mascarpone: Italian luxury
- Coconut cream: dairy-free
- Ricotta: lighter texture
- White chocolate: sweeter
Different setters
- Agar agar: plant-based
- Cornstarch: gentle set
- Egg-free: stability focus
- Pectin: fruit-based
- Arrowroot: clear set
- Xanthan gum: small amount
Additional flavors
- Coconut: tropical twist
- Mint: refreshing contrast
- Ginger: spicy complement
- White chocolate: sweet balance
- Berry swirl: color contrast
- Browned butter: nutty depth
Different presentations
- Individual jars: portion control
- Tart form: elegant slices
- Mini bars: party size
- Layered parfait: deconstructed
- Square slices: classic
- Round: pie alternative
Serving & presentation techniques
Proper serving and presentation elevate these key lime cheesecake bars from simple dessert to restaurant-quality experience through careful cutting, garnishing, and plating techniques.
Presentation principles
- Cutting technique: Use hot, clean knife for each cut. Wipe blade between slices. Consider using dental floss for crumb-free edges. Chill bars thoroughly before cutting for cleanest slices.
- Garnish placement: Fresh whipped cream should be piped or dolloped just before serving. Lime slices or twists provide visual interest. Additional zest adds color and aroma. Mint sprigs offer contrast.
- Plating arrangements: Individual plates allow for artistic presentation. Cake stands elevate for buffet service. Rectangular platters for modern look. Doilies or edible flowers for special occasions.
- Temperature serving: Serve chilled but not ice-cold. Remove from refrigerator 10-15 minutes before serving for optimal flavor and texture. The bars should be firm but not hard.
- Sauce accompaniments: Raspberry coulis provides color contrast. Caramel sauce offers sweet complement. Chocolate drizzle creates sophistication. Fruit purees enhance citrus notes.
- Portion control: Cut into 16 squares for standard servings. 9 larger pieces for more generous portions. 25 mini bars for party finger food. Adjust based on occasion and accompaniments.
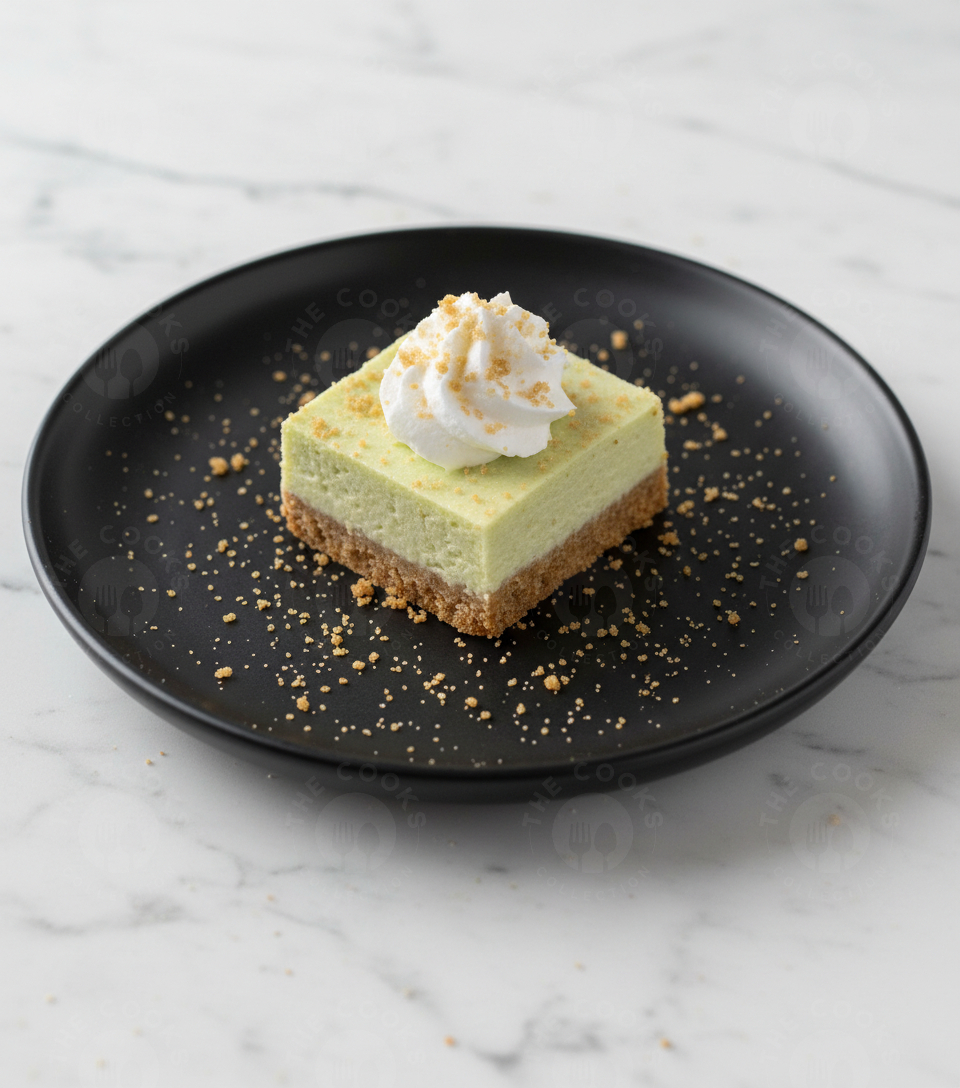
The visual appeal comes from the contrast between the pale green filling, golden crust, white whipped cream, and vibrant lime garnishes. Clean cuts and careful garnish placement create professional appearance that matches the sophisticated flavor profile.
Equipment notes & recommendations
Proper equipment selection significantly impacts the ease of preparation and final quality of key lime cheesecake bars, from mixing tools to setting containers and serving implements.
Mixing equipment
Stand mixer: consistent creaming. Paddle attachment: smooth incorporation. Whisk attachment: cream whipping. Rubber spatula: thorough scraping. Measuring tools: accurate proportions. Mixing bowls: various sizes.
Preparation tools
9×9 pan: ideal proportions. Parchment paper: easy removal. Zester: fine zest. Juicer: maximum yield. Offset spatula: smooth topping. Fine mesh sieve: lump removal.
Serving equipment
Sharp knife: clean cuts. Cake server: elegant presentation. Piping bags: decorative garnish. Microplane: fresh zest. Portion control: consistent sizing. Storage containers: preservation.
Storage & shelf life guidelines
Proper storage techniques maintain the texture, flavor, and appearance of key lime cheesecake bars while preventing common issues like drying out, flavor loss, or textural changes.
Storage methods and timelines
- Refrigerator storage: Store in airtight container in refrigerator for up to 5 days. Place parchment between layers if stacking. The flavor actually improves over the first 24-48 hours.
- Freezing options: Freeze unfrosted bars for up to 3 months. Wrap individually in plastic, then place in airtight container. Thaw in refrigerator overnight before serving.
- Garnish timing: Add whipped cream and fresh garnishes just before serving. These elements don’t store well and will deteriorate if added in advance.
- Temperature consistency: Avoid temperature fluctuations which can cause condensation and textural changes. Keep refrigerated until ready to serve.
- Cutting considerations: For cleanest storage, cut into portions before refrigerating but add garnishes later. Whole blocks can be stored then cut when needed.
- Transportation tips: Use rigid containers with secure lids. Pack with cold packs if traveling. Consider partial freezing for warm weather transport.
The bars will gradually soften over several days as the crust absorbs moisture from the filling. For longest shelf life and best texture, consume within 3 days. The lime flavor remains bright and vibrant throughout the storage period, making these excellent make-ahead desserts for entertaining.
Frequently asked questions
Can I make these bars ahead of time?
Yes, these bars are ideal for making ahead. The flavor actually improves with 24-48 hours of refrigeration as the lime flavor mellows and integrates with the dairy components. Prepare up to 3 days in advance, but add garnishes just before serving.
What’s the difference between key limes and regular limes?
Key limes are smaller, more aromatic, and have a more complex flavor profile with floral notes alongside the tartness. Regular Persian limes are larger, less aromatic, and have a more straightforward tart flavor. Key limes are also typically more expensive and seasonal.
Can I make these without gelatin?
The bars will not set properly without a setting agent. For gelatin-free version, use agar agar (follow package instructions for equivalent) or increase the whipped cream volume and serve as a mousse-like dessert in cups rather than sliced bars.
Why did my filling not set properly?
Common causes include: insufficient gelatin, inadequate chilling time, ingredients too warm when mixed, or overmixing after gelatin addition. Ensure proper measurements, chill fully, and follow incorporation techniques precisely.
Can I use bottled key lime juice?
Yes, bottled key lime juice works well and provides consistent results. Fresh is ideal for maximum flavor, but high-quality bottled juice is an excellent alternative, especially when key limes are out of season.
How do I get clean slices?
Chill thoroughly, use a hot knife (dip in hot water and wipe clean between cuts), and cut with a single decisive motion rather than sawing. For perfect edges, chill the cut bars for 15 minutes after slicing to firm up the edges.
Baker notes & professional tips
These insights from professional bakers and extensive testing will help you achieve consistent, restaurant-quality results with these key lime pie cheesecake bars.
Advanced techniques for perfect results
- Temperature management: All ingredients should be at cool room temperature (68-70°F) except the heavy cream, which should be very cold for maximum volume when whipped.
- Zest extraction: Use microplane for finest zest without bitter pith. zest limes before juicing for easiest workflow. Freeze extra zest in small portions for future use.
- Cream cheese preparation: Unwrap and let stand at room temperature for 1-2 hours before using. Cutting into chunks speeds softening. Never microwave to soften as it affects texture.
- Gelatin precision: Use exactly one packet (typically 2 1/2 teaspoons). Measure carefully if using bulk gelatin. The gelatin must be completely dissolved but not overheated.
- Layering technique: For extra visual appeal, create a thin layer of sweetened crushed graham crackers between crust and filling, or add a swirl of fruit puree to the filling.
- Flavor enhancement: A pinch of salt enhances all the flavors. A teaspoon of cornstarch mixed with the powdered sugar helps stabilize the filling. A tablespoon of limoncello intensifies citrus notes.
- Texture optimization: For ultra-smooth filling, press through fine mesh sieve after mixing. For lighter texture, fold in an additional 1/2 cup of whipped cream at the very end.
- Scaling recipes: This recipe doubles perfectly for 9×13 pan. Adjust gelatin to 1 1/2 packets for larger volume. Baking time remains the same (no bake).
The most common success factor is patience – allowing proper chilling time, complete ingredient softening, and careful attention to mixing techniques. Rushing any step compromises the delicate texture and flavor balance that define exceptional no-bake cheesecake bars. The 6-hour chilling time is not arbitrary – it allows for complete setting and flavor development that cannot be achieved with shorter chilling periods.