Pumpkin Spice Thumbprint Cookies
Pumpkin Spice Thumbprint Cookies
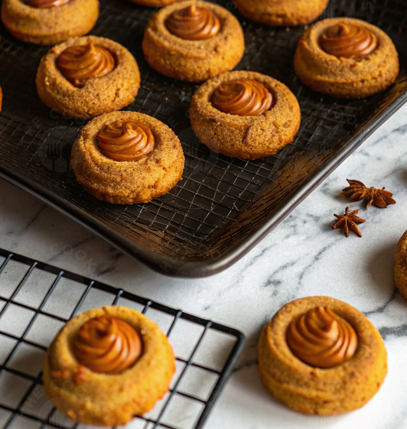
These pumpkin spice thumbprint cookies achieve perfect texture through careful pumpkin moisture management and proper thumbprint technique. The method focuses on creating a soft, cake-like cookie that holds its shape while baking, with a creamy pumpkin filling that stays smooth and doesn’t crack. The result is a double pumpkin treat with spiced cookie base and creamy pumpkin center that delivers autumn flavors in every bite.
Why this recipe works
Pumpkin moisture balance. Using the right amount of pumpkin puree creates a soft, cake-like cookie without making the dough too wet. The 1/2 cup pumpkin in the dough provides moisture and flavor while the flour ratio (1 1/2 cups) gives enough structure to hold the thumbprint shape. Pumpkin is about 90% water, so this recipe carefully balances the extra liquid with the dry ingredients to prevent spreading while keeping the cookies tender. The result is cookies that are soft but not soggy, with a texture that complements the creamy filling.
Dual pumpkin approach. Using pumpkin in both the cookie dough and the filling creates layered pumpkin flavor that isn’t overwhelming. The dough has subtle pumpkin notes enhanced by pumpkin pie spice, while the filling delivers a more concentrated pumpkin cream cheese flavor. This approach prevents the cookies from tasting like plain spice cookies while avoiding an overly strong pumpkin taste that might be too much for some people. The cream cheese in the filling adds tanginess that cuts through the sweetness and complements the pumpkin perfectly.
Thumbprint technique. Creating the indentations before baking ensures the filling has a perfect home that doesn’t disappear during oven spring. The 1-inch dough balls are the ideal size – large enough to hold a generous filling portion but small enough to bake evenly. Using your thumb or the back of a teaspoon creates consistent wells that hold their shape. The shallow indentations prevent the filling from overflowing during baking while ensuring each bite includes both cookie and filling.
Spice distribution. Adding pumpkin pie spice to both the dough and filling creates harmonious flavor throughout. The dough has a background warmth from the spice, while the filling has a more pronounced spice note that hits the palate first. This layered spice approach makes the cookies taste more complex and well-balanced. Using pre-mixed pumpkin pie spice ensures consistent flavor, but the blend of cinnamon, ginger, nutmeg, and allspice could be adjusted to personal preference.
Baking temperature control. The 350°F oven temperature is perfect for pumpkin cookies because it’s hot enough to set the structure quickly but gentle enough to prevent the filling from cracking or bubbling over. The 12-15 minute baking time allows the cookies to cook through without drying out, and the lightly golden edges indicate perfect doneness. The cookies continue to firm up as they cool on the baking sheet, developing the ideal soft-but-not-too-soft texture.
Ingredients (cups & tablespoons only)
Cookie Dough
- 1 1/2 cupsall-purpose flour
- 1/2 tspbaking soda
- 1/4 tspsalt
- 1 tsppumpkin pie spice
- 1/2 cupunsalted butter, softened
- 1/2 cupgranulated sugar
- 1/4 cupbrown sugar
- 1 largeegg
- 1 tspvanilla extract
- 1/2 cuppumpkin puree
Pumpkin Filling
- 1/2 cuppumpkin puree
- 1/4 cupcream cheese, softened
- 1/4 cuppowdered sugar
- 1/2 tsppumpkin pie spice
Recipe
- Prep oven and pan: Preheat oven to 350°F (175°C). Line baking sheet with parchment paper. The parchment prevents sticking and makes cleanup easy.
- Mix dry ingredients: In medium bowl, whisk together 1 1/2 cups flour, 1/2 tsp baking soda, 1/4 tsp salt, and 1 tsp pumpkin pie spice. Whisking removes lumps and spreads the spices evenly.
- Cream butter and sugars: In large bowl, cream together 1/2 cup softened butter, 1/2 cup granulated sugar, and 1/4 cup brown sugar until light and fluffy (2-3 minutes). This creates air pockets for lighter cookies.
- Add wet ingredients: Beat in 1 egg and 1 tsp vanilla extract until smooth. Then stir in 1/2 cup pumpkin puree until just combined. Don’t overmix at this stage.
- Combine mixtures: Gradually add dry ingredients to wet ingredients, mixing until just combined. The dough will be soft but should hold its shape. If too sticky, chill 15 minutes.
- Shape cookies: Roll dough into 1-inch balls and place them 2 inches apart on prepared baking sheet. The balls should be smooth and uniform for even baking.
- Create thumbprints: Use your thumb or back of teaspoon to make shallow indentations in center of each cookie. Don’t press all the way to the baking sheet.
- Make filling: In small bowl, combine 1/2 cup pumpkin puree, 1/4 cup softened cream cheese, 1/4 cup powdered sugar, and 1/2 tsp pumpkin pie spice. Mix until smooth.
- Fill cookies: Spoon or pipe about 1 teaspoon filling into each cookie indentation. Don’t overfill or the filling may bubble over during baking.
- Bake: Bake 12-15 minutes until edges are lightly golden. The centers will look soft but set. Rotate pan halfway for even baking.
- Cool properly: Let cookies cool on baking sheet for 5 minutes before moving to wire rack. This allows them to firm up without breaking.
The cookies will be very soft when they come out of the oven but will firm up as they cool. For best results, let them cool completely before serving so the filling sets properly.
Nutrition (estimated)
| Nutrient | Amount |
|---|---|
| Calories | ~150 kcal |
| Total Fat | 7 g |
| Saturated Fat | 4 g |
| Trans Fat | 0 g |
| Cholesterol | 25 mg |
| Sodium | 85 mg |
| Total Carbohydrates | 20 g |
| Dietary Fiber | 1 g |
| Total Sugars | 10 g |
| Added Sugars | 8 g |
| Protein | 2 g |
| Vitamin D | 0.1 mcg |
| Calcium | 15 mg |
| Iron | 1 mg |
| Potassium | 60 mg |
Nutrition calculated with standard ingredient measurements. Values are estimates and will vary based on specific brands and exact measurements. Using reduced-fat cream cheese will lower fat content slightly.
Pumpkin selection & preparation
Pumpkin types
Canned puree: consistent, convenient. Fresh pumpkin: seasonal, flavorful. Pumpkin pie filling: not recommended (already sweetened). Organic puree: often thicker, richer color. Choose based on availability and preference.
Moisture control
Canned pumpkin: usually perfect consistency. Fresh pumpkin: may need draining. Too wet: blot with paper towels. Too dry: add teaspoon milk. Proper moisture ensures correct dough texture and prevents spreading.
Flavor enhancement
Quality pumpkin: deeper flavor. Roasted pumpkin: caramelized notes. Spice balance: enhances natural sweetness. Cream cheese: cuts sweetness. Brown sugar: adds depth. Each element contributes to final taste.
Dough techniques & consistency
Proper dough handling ensures the cookies hold their thumbprint shape while baking and develop the ideal soft texture. The goal is a dough that’s workable but not tough.
Dough characteristics
- Ideal consistency: Soft but not sticky, holds shape when rolled. If too sticky, add 1-2 tablespoons flour. If too dry, add teaspoon milk.
- Rolling technique: Use light pressure, roll between palms. Don’t compact the dough. Uniform size ensures even baking.
- Chilling benefits: 15-30 minutes if dough too soft. Firms butter, prevents spreading. Not always necessary but helpful in warm kitchens.
- Portion control: 1-inch balls create perfect thumbprint size. Tablespoon cookie scoop ensures consistency. Eyeballing works with practice.
The dough will be softer than traditional cookie dough because of the pumpkin puree. This is normal and creates the cake-like texture. If the dough seems too soft to handle, chilling for 15-30 minutes makes it easier to work with.
Filling methods & consistency control
The pumpkin cream cheese filling requires proper preparation to achieve smooth, pipeable consistency that holds its shape during baking without cracking or bubbling over.
Filling consistency
Should be thick but pipeable. Too thin: add more powdered sugar. Too thick: add teaspoon milk. Smooth texture: no lumps. Cream cheese must be fully softened for best results.
Application methods
Small spoon: easiest, most accessible. Piping bag: most professional, neatest. Plastic bag with corner cut: good compromise. Teaspoon measure: consistent portioning.
Filling amount
About 1 teaspoon per cookie. Too much: bubbles over during baking. Too little: disappointing ratio. Level with cookie surface: attractive appearance. Slight dome: traditional look.
Baking science & cookie texture
The 350°F baking temperature creates the ideal environment for proper cookie set, filling stability, and flavor development through controlled heat application and timing.
Baking stages
- Initial set (0-5 minutes): Butter melts, cookies begin to spread slightly. Filling warms but holds shape.
- Structure formation (5-10 minutes): Proteins set, cookies achieve final shape. Filling becomes firm but remains creamy.
- Browning stage (10-15 minutes): Edges turn golden, Maillard reaction develops flavor. Filling sets completely without cracking.
- Carryover cooking (5 minutes rest): Residual heat completes cooking process. Cookies firm up to perfect texture.
- Final set (cooling): Structure stabilizes, filling firms. Flavors meld and intensify.
The parchment-lined baking sheets promote even browning and prevent the bottoms from getting too dark. The 2-inch spacing allows for proper air circulation, ensuring all cookies bake evenly.
Common mistakes (and quick fixes)
- Filling bubbles over: Too much filling or overfilled indentations. Use exactly 1 teaspoon filling, don’t overfill wells. If bubbling occurs, they’ll still taste great.
- Cookies spread too much: Dough too warm or too much pumpkin. Chill dough 15 minutes, measure pumpkin accurately. For spread cookies, they’re still delicious.
- Thumbprints disappear: Indentations too shallow or dough too soft. Press deeper wells, chill dough before shaping. If prints close up, redefine after baking.
- Filling cracks: Overbaked or filling too thick. Reduce baking time, adjust filling consistency. Cracked filling still tastes wonderful.
- Pale cookies: Underbaked or oven temperature low. Extend baking 1-2 minutes, verify oven temperature. Pale cookies are actually preferred by some.
- Dry cookies: Overbaked or too much flour. Reduce baking time, measure flour correctly. Serve with coffee or tea to compensate.
- Filling too runny: Pumpkin too wet or insufficient powdered sugar. Drain pumpkin if needed, add more powdered sugar. Runny filling still tastes good.
- Dough too sticky: Pumpkin too wet or warm kitchen. Add 1-2 tablespoons flour, chill dough. Sticky dough can be scooped instead of rolled.
Substitutions & variations
Different flours
- Whole wheat: nuttier, denser
- Gluten-free blend: 1:1 substitution
- Spelt flour: lighter, nutty flavor
- Oat flour: softer, more crumbly
Different fillings
- Cream cheese only: simpler, tangier
- Maple cream: autumn flavor
- White chocolate: sweeter option
- Caramel: rich, gooey center
Different spices
- Cinnamon only: simpler flavor
- Gingerbread spice: holiday twist
- Apple pie spice: different autumn flavor
- Cardamom: sophisticated note
Different sweeteners
- Maple syrup: liquid adjustment needed
- Honey: distinct flavor
- Coconut sugar: lower glycemic
- Monk fruit: sugar-free option
Special diets
- Vegan: plant-based substitutes
- Gluten-free: GF flour blend
- Dairy-free: vegan butter, cream cheese
- Reduced sugar: sugar alternatives
Different forms
- Mini thumbprints: bite-sized treats
- Bar cookies: easier serving
- Sandwich cookies: double the filling
- Drop cookies: no thumbprint
Any substitution may affect cooking time, texture, and flavor balance. When substituting sweeteners, adjust other liquids accordingly. Gluten-free flours often require additional binding agents.
Serving & presentation
Garnish ideas
Powdered sugar: elegant dusting. Cinnamon sugar: sparkly topping. Pecan half: decorative, crunchy. White chocolate drizzle: pretty contrast. Extra pumpkin spice: aromatic finish.
Presentation styles
Rustic platter: casual serving. Tiered stand: elegant display. Individual boxes: thoughtful gifts. Parchment-lined basket: farmhouse style. Colorful plate: festive appearance.
Accompaniments
Hot coffee: classic pairing. Spiced tea: complementary flavors. Vanilla ice cream: dessert upgrade. Whipped cream: light contrast. Mulled cider: seasonal beverage.
Equipment notes
- Mixing bowls: Medium for dry ingredients, large for wet. Non-slip bottoms prevent movement. Glass shows ingredient incorporation clearly.
- Measuring tools: Dry measuring cups for flour and sugars. Liquid measuring cup optional for pumpkin. Measuring spoons for small quantities. Scale for most accuracy.
- Baking sheets: Light-colored aluminum promotes even browning. Rimmed sheets contain any spills. Parchment paper essential for easy removal.
- Mixer options: Stand mixer for easy creaming. Hand mixer works perfectly. Whisk and spoon possible with extra effort. Don’t overmix by machine.
- Cookie scoops: Tablespoon-sized scoop for consistent balls. Spring-release easiest to use. Two spoons work as alternative. Uniform size ensures even baking.
- Piping tools: Piping bag with round tip for neat filling. Plastic bag with corner cut works well. Small spoon most accessible. Teaspoon measure for consistency.
- Cooling racks: Wire racks allow air circulation. Prevents soggy bottoms. Essential for proper setting. Multiple racks helpful for batch baking.
Storage & reheating
- Room temperature: Store in airtight container up to 3 days. Place parchment between layers if stacking. The filling contains cream cheese, so refrigeration is recommended for longer storage.
- Refrigeration: Store in airtight container up to 1 week. Bring to room temperature before serving for best texture and flavor. The cookies may firm up when chilled.
- Freezing baked cookies: Freeze up to 3 months. Place in single layer on parchment-lined sheet to freeze solid, then transfer to freezer bags. Thaw at room temperature.
- Freezing dough: Portion dough balls and freeze on parchment-lined sheet. Transfer to freezer bags once solid. Bake frozen, adding 1-2 minutes to baking time.
- Refreshing cookies: Warm in 300°F oven for 3-5 minutes to restore freshness. Microwave makes cookies rubbery – avoid if possible. The gentle oven heat revives the texture.
Frequently asked questions
Can I use fresh pumpkin instead of canned?
Yes, but you’ll need to prepare it properly. Roast pumpkin until tender, then puree until smooth. Drain excess liquid by placing puree in cheesecloth or fine strainer. The texture should match canned pumpkin puree.
Why did my thumbprints close up during baking?
This usually means the indentations weren’t deep enough or the dough was too soft. Press deeper wells and chill the dough for 15-30 minutes before baking to help them hold their shape.
Can I make these without cream cheese in the filling?
Yes, you can use all pumpkin puree with extra powdered sugar to thicken it. The flavor will be different – less tangy and more straightforwardly sweet. You could also try mascarpone as a substitute.
My filling is too runny – how can I fix it?
Add more powdered sugar, 1 tablespoon at a time, until it reaches pipeable consistency. If the pumpkin was particularly wet, you might need quite a bit more. Chilling the filling for 15 minutes can also help thicken it.
Can I prepare the dough ahead of time?
Absolutely! The dough can be refrigerated for up to 3 days or frozen for 3 months. Let it come to room temperature before shaping and baking. The flavor may actually improve with a rest in the refrigerator.
Why are my cookies cakey instead of chewy?
Pumpkin cookies naturally have a cake-like texture due to the moisture in the pumpkin puree. For chewier cookies, you could try reducing the pumpkin slightly or adding an extra tablespoon of butter.
Can I double this recipe?
Yes, it doubles well. You may need to bake in more batches since overcrowding the oven affects baking time and texture. Mix in two batches if your bowl isn’t large enough to accommodate the doubled ingredients.
Cook notes & pro tips
Flavor development
The pumpkin flavor becomes more pronounced after the cookies cool completely. For best flavor, wait at least 2 hours after baking before serving. The spices continue to meld and develop as they sit.
Texture secrets
For extra-soft cookies, slightly underbake (closer to 12 minutes). For firmer cookies, bake closer to 15 minutes. The cookies continue to set as they cool, so remove them when they look slightly underdone.
Timing tips
Make the filling while the oven preheats so it’s ready when you need it. You can also make both dough and filling up to 2 days ahead and refrigerate separately. Bring to room temperature before assembling and baking.