Salted Caramel Apple Bars
Salted Caramel Apple Bars
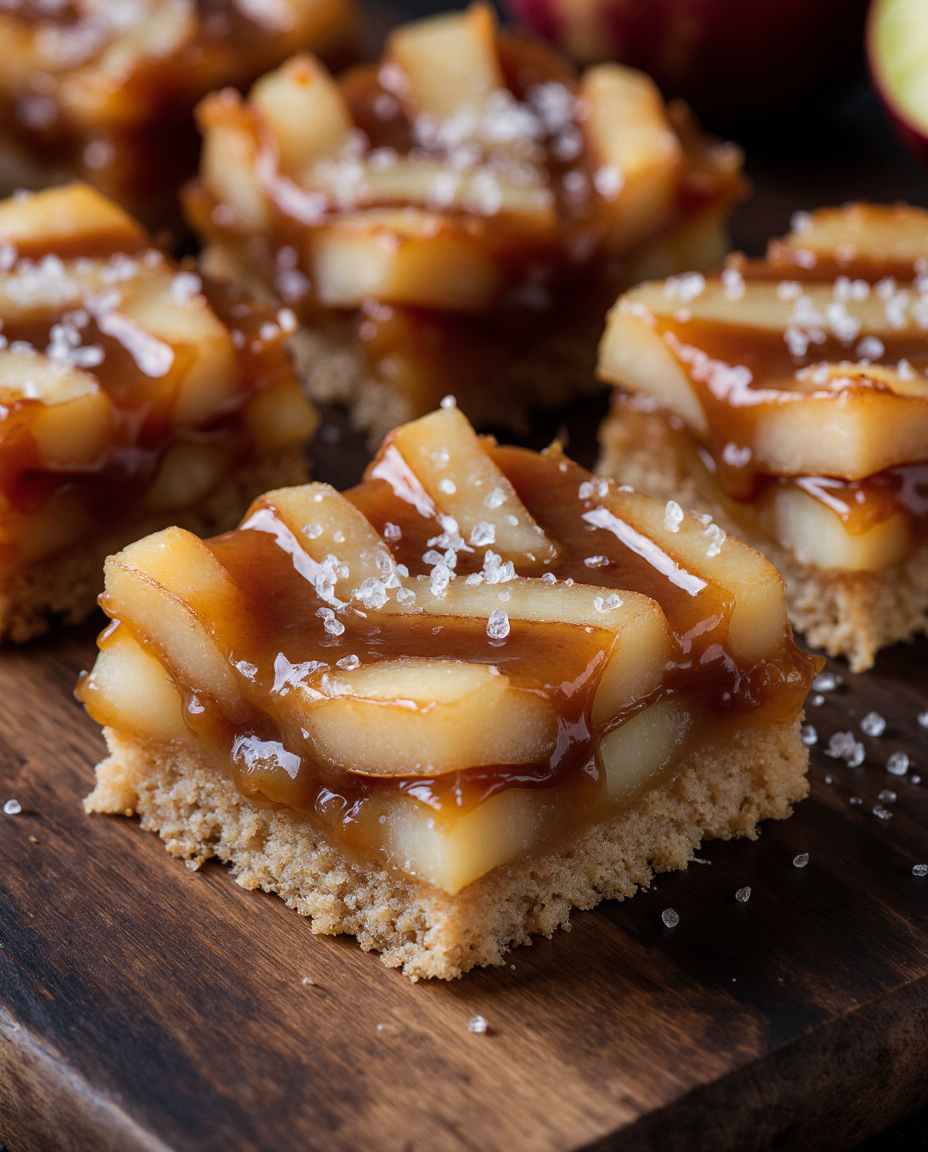
These apple bars achieve perfect texture through apple selection that holds its shape during baking and crust formulation that stays crisp under the juicy filling. The method focuses on apple preparation that controls moisture release, crust technique that provides sturdy base without becoming tough, and caramel integration that adds flavor without making the bars soggy. Everything here works for standard baking pans with techniques that ensure clean slices, balanced sweetness, and professional results that hold together for serving.
Why this recipe works
Apple variety selection. Using a mix of firm baking apples (like Granny Smith) and sweeter varieties (like Honeycrisp) creates balanced flavor and texture. The tart apples provide structure that holds up during baking, while the sweeter varieties contribute natural sweetness and softer texture. This combination prevents the filling from becoming either too firm or too mushy.
Crust engineering. The shortbread-like crust uses cold butter and an egg yolk to create a sturdy yet tender base that withstands the moist apple filling without becoming soggy. The pre-baking step sets the structure and creates a barrier that prevents liquid absorption, while the egg yolk adds richness and binding power without making the crust tough.
Moisture control system. Tossing the apples with flour and sugar before baking creates a natural thickening system. The flour absorbs some of the apple juices during baking, creating a cohesive filling rather than a watery one, while the sugar draws out just enough moisture to create a syrupy consistency without making the apples rubbery.
Layered texture approach. The crumb topping provides contrasting texture to the soft apple filling and firm crust. The combination of flour, butter, and oats creates clusters that bake up crisp and golden, while the rolled oats add chewiness that complements the tender apples.
Caramel timing strategy. Adding the caramel after baking prevents it from burning or becoming too hard during the extended baking time. The residual heat warms the caramel enough to make it pourable while allowing it to set to the perfect soft-but-substantial consistency as the bars cool.
Ingredients (cups & tablespoons only)
Crust
- 2 cupsall-purpose flour
- 1/2 cupgranulated sugar
- 1/2 tspsalt
- 3/4 cupbutter, cold, cubed
- 1egg yolk
Apple Filling
- 4 cupsapples, peeled & sliced
- 2 tbspall-purpose flour
- 1/4 cupbrown sugar, packed
- 2 tbspgranulated sugar
- 1 tspcinnamon
- 1/4 tspnutmeg
- 1 tbsplemon juice
- 1 tspvanilla extract
Crumb Topping
- 1/2 cupall-purpose flour
- 1/4 cupbrown sugar, packed
- 1/4 cupbutter, cold, cubed
- 1/4 cuprolled oats
- 1/4 tspcinnamon
Caramel & Finish
- 1/2 cupcaramel sauce
- 1/2 tspflaky sea salt
- 1 tbspheavy cream
Recipe
- Prep pan and oven: Preheat oven to 350°F. Line 9×9 inch baking pan with parchment paper, leaving overhang on two sides for easy removal. Lightly grease exposed pan areas.
- Make crust: In food processor, pulse flour, granulated sugar, and salt to combine. Add cold cubed butter and pulse until mixture resembles coarse crumbs with some pea-sized butter pieces remaining.
- Form crust: Add egg yolk and pulse just until dough begins to clump together. It should hold together when pressed but not form a ball. Press dough evenly into prepared pan.
- Pre-bake crust: Bake crust 15-18 minutes until edges are lightly golden and surface looks dry. Cool while preparing filling. This step prevents soggy bottom.
- Prepare apples: Peel and slice apples into 1/4-inch thick slices. In large bowl, toss apple slices with lemon juice to prevent browning.
- Season filling: Add 2 tbsp flour, brown sugar, granulated sugar, cinnamon, nutmeg, and vanilla to apples. Toss gently until apples are evenly coated.
- Make crumb topping: In medium bowl, combine 1/2 cup flour, brown sugar, cinnamon, and rolled oats. Cut in cold butter using pastry cutter or fingers until mixture forms coarse crumbs.
- Assemble bars: Arrange apple mixture evenly over pre-baked crust. Sprinkle crumb topping evenly over apples, covering completely.
- Bake: Bake 35-40 minutes until topping is golden brown and apples are tender when pierced with knife through the topping. The filling should be bubbly around edges.
- Add caramel: While bars are still warm, whisk caramel sauce with heavy cream until smooth. Drizzle evenly over bars and immediately sprinkle with flaky sea salt.
- Cool and slice: Cool completely in pan on wire rack (about 2 hours). Use parchment to lift bars from pan. Cut into 16 squares with sharp knife.
The bars must cool completely before slicing—this allows the filling to set and prevents crumbling. Rushing this step results in messy bars.
Apple selection & preparation
Variety combinations
Use 2 parts firm apples (Granny Smith, Braeburn) to 1 part soft apples (Honeycrisp, Fuji). The firm varieties provide structure while soft varieties contribute sweetness and moisture.
Slicing technique
Slice apples 1/4-inch thick for even cooking. Thinner slices become mushy; thicker slices may not cook through. Uniform size ensures consistent texture.
Preventing browning
Toss sliced apples immediately with lemon juice. The acid prevents oxidation while adding brightness that balances the sweetness. Don’t skip this step.
Crust technique & texture control
Butter temperature importance. Cold butter is essential for flaky, tender crust. The solid butter pieces create steam pockets during baking that result in flakiness. If the butter melts before baking, the crust becomes dense and tough rather than light and crumbly.
Mixing method. Pulse in food processor until the mixture resembles coarse crumbs with some pea-sized butter pieces remaining. Over-processing develops gluten and makes the crust tough. The dough should hold together when pressed but not form a smooth ball.
Pre-baking science. Baking the crust before adding the filling creates a moisture barrier that prevents sogginess. The 15-minute pre-bake sets the structure and creates a lightly golden base that can withstand the juicy apple filling without becoming saturated.
Pressing technique. Use flat-bottomed measuring cup or glass to press the crust firmly and evenly into the pan. The crust should be compact but not compressed into a solid mass. This creates a sturdy base that holds together when sliced.
Egg yolk function. The egg yolk provides richness and binding power without adding excess liquid. The fat in the yolk contributes to tender texture while the proteins help bind the crust together for clean slicing.
Caramel integration & timing
The caramel should be added at the perfect moment to ensure proper setting without making the bars soggy or the caramel too hard.
Caramel application stages
- Too early: Caramel sinks into bars, makes them soggy and difficult to slice
- Too late: Caramel doesn’t adhere properly, slides off when cutting
- Ideal timing: When bars are warm but not hot—caramel sets as bars cool
Thin the caramel slightly with heavy cream for better drizzling consistency. The cream also prevents the caramel from becoming too hard when cooled.
Common mistakes (and quick fixes)
- Soggy bottom crust: Insufficient pre-baking or apples too juicy. Pre-bake crust full 15 minutes and use flour in apple mixture to absorb juices.
- Crumbly crust: Under-mixed or insufficient binding. Ensure dough holds together when pressed before baking. Add 1 tbsp cold water if too dry.
- Apples not tender: Sliced too thick or underbaked. Slice apples 1/4-inch thick and bake until knife-tender through topping.
- Burnt topping: Oven too hot or baked too long. Use 350°F and tent with foil if browning too quickly after 25 minutes.
- Caramel too hard: Added when bars too hot or caramel too thick. Add when warm but not hot, and thin caramel with cream.
- Bars falling apart: Sliced too soon or insufficient cooling. Cool completely (2+ hours) for filling to set properly.
- Too sweet: Wrong apple variety or too much sugar. Use tart apples and measure sugars precisely.
Substitutions & variations
Different fruits
- Pears instead of apples
- Peaches + apples combination
- Berries mixed with apples
Different spices
- Add 1/4 tsp cardamom
- 1/8 tsp cloves for warmth
- 1/2 tsp ginger for spice
Different toppings
- Streusel without oats
- Add 1/4 cup chopped nuts
- Add 2 tbsp shredded coconut
Different bases
- Graham cracker crust
- Oat flour for nuttiness
- Add 1/4 cup ground almonds
Different finishes
- Saltless caramel for classic
- Dulce de leche instead of caramel
- Vanilla glaze instead of caramel
Special diets
- Gluten-free: 1:1 GF flour
- Vegan: plant-based butter + egg substitute
- Reduced sugar: 1/4 cup sugar total
When substituting fruits, adjust baking time based on moisture content—berries release more liquid than apples, while pears may need less time to become tender.
Serving & presentation
- Slicing technique: Use sharp chef’s knife and wipe between cuts for clean edges. Cut into 16 even squares for standard portions.
- Plating style: Serve on individual plates with the caramel-drizzled side up. The layered appearance should be visible in the cross-section.
- Garnish options: Additional caramel drizzle, vanilla ice cream, or whipped cream complement the bars without overwhelming them. A light dusting of cinnamon works for simpler presentation.
- Temperature service: Best at room temperature when the caramel is soft but set. Can be served slightly warm with ice cream for dessert or at room temperature for snacks.
- Portion planning: 1 bar per person for dessert, 2 for larger appetites. They’re rich, so people may want smaller portions than expected.
Batching & make-ahead
Crust preparation
Make and pre-bake crust up to 2 days ahead. Store covered at room temperature. The pre-baking helps it stay crisp.
Complete bars
Bars keep 3 days at room temperature or 5 days refrigerated. The flavor improves over the first 24 hours as the components meld.
Freezing
Freeze un-sliced or individual bars up to 3 months. Wrap tightly in multiple layers. Thaw at room temperature.
Equipment notes
- Baking pan: 9×9 inch metal pan provides ideal thickness. Glass or ceramic may require longer baking time. Dark metal pans may promote faster browning.
- Food processor: Ideal for perfect crust texture. If using pastry cutter, work quickly to keep butter cold. The crust should have visible butter pieces.
- Apple peeler/corer: Optional but helpful for efficient apple preparation. A sharp chef’s knife works perfectly for slicing.
- Parchment paper: Essential for clean removal. Leave 2-inch overhang on two opposite sides for handles to lift bars from pan.
- Cooling rack: Crucial for proper cooling. Air circulation prevents soggy bottom and ensures even cooling throughout.
Nutrition (estimated)
| Nutrient | Amount |
|---|---|
| Calories | ~320 kcal |
| Total Fat | 16 g |
| Saturated Fat | 10 g |
| Carbohydrates | 45 g |
| Total Sugars | 30 g |
| Fiber | 2 g |
| Protein | 3 g |
| Sodium | ~220 mg |
| Vitamin C | ~6% DV |
Numbers are estimates and will vary based on specific ingredients, especially apple variety, caramel brand, and exact measurements. Using reduced-sugar caramel lowers sugar content.
Storage & shelf life
- Room temperature: Store in airtight container up to 3 days. The bars maintain best texture at room temperature.
- Refrigeration: Can be refrigerated up to 1 week, but the crust may soften slightly. Bring to room temperature before serving.
- Freezing: Freeze up to 3 months. Wrap individual bars tightly in plastic then foil. Thaw at room temperature 2-3 hours.
- Texture changes: The bars become more moist and flavorful over the first 24 hours. The crust may soften slightly but remains enjoyable.
- Caramel stability: The caramel will remain soft but set at room temperature. Refrigeration may cause it to harden slightly.
- Best consumed: Within 3 days for optimal texture. After 5 days, the crust may become too soft.
FAQ
Can I use store-bought caramel instead of homemade?
Yes—use a thick, high-quality caramel sauce. Thin, ice cream topping-style caramel may make the bars too wet. If using thin caramel, reduce the amount to 1/3 cup.